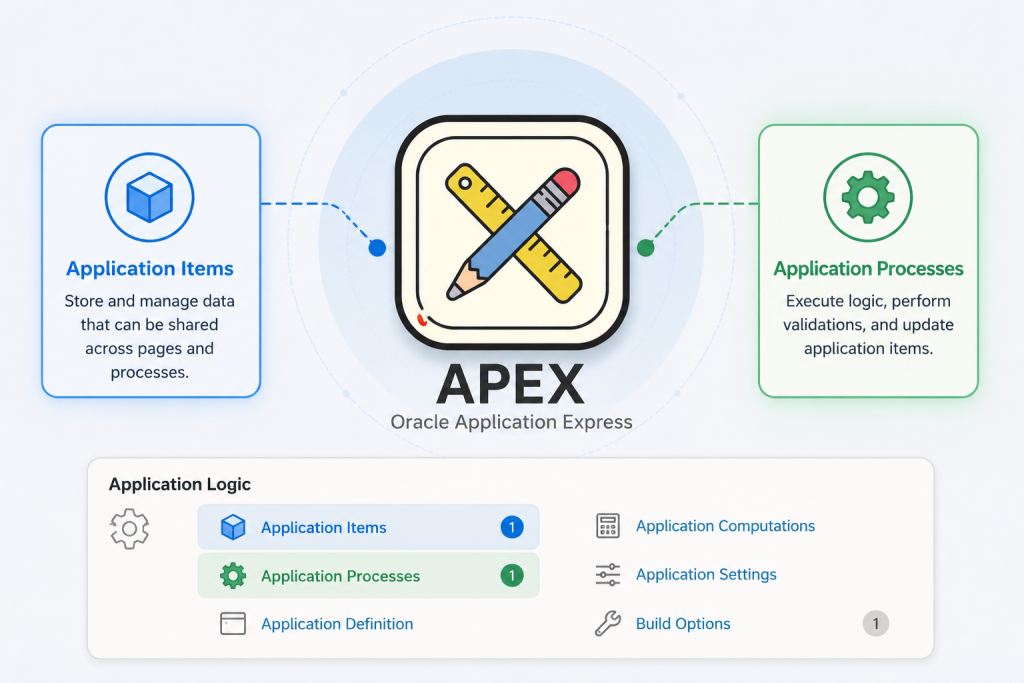
About Application Items :
Application items in Oracle APEX are a type of shared component used for maintaining session state without displaying anything to the user. They act like global variables for your application.
Application items are invisible to end users. They exist only in the background to store and carry values across pages during a user’s session. Unlike page items (e.g., text fields or select lists that appear on the screen), application items have no visual rendering.
Example:
You might create an application item called APP_USER_ROLE to store whether the logged-in user is an “ADMIN” or “USER“. This value stays available on every page without needing to query the database repeatedly or show it on the UI.
Application items can be set using computations, processes, or by passing values on a URL.
You have multiple ways to assign or update the value of an application item:
- Using a Computation (e.g., On New Instance or After Login): Set APP_USER_ID to APEX_UTIL.GET_SESSION_ID or pull from a table based on the current user.
- Using a Process (e.g., on a login page After Processing):
BEGIN
APEX_UTIL.SET_SESSION_STATE('APP_USER_ROLE', 'ADMIN');END; - Passing on a URL (e.g., when branching to another page):
f?p=&APP_ID.:10:&APP_SESSION.:::APP_USER_ROLE:ADMIN
This sets the application item APP_USER_ROLE to “ADMIN” when navigating to page 10.
Application items are ideal for data that needs to be available application-wide (across multiple pages) but shouldn’t appear on the screen and isn’t tied to a single page’s context.
How to Create an Application Item
- Go to Shared Components → Application Items.
- Click Create.
- Give it a Name (e.g., APP_USER_ROLE).
- Optionally set Scope (Application or Global if sharing sessions across multiple apps).
About Applications Processes :
Application Processes in Oracle APEX allow you to define reusable PL/SQL logic once at the application level and have it execute automatically at a chosen point across multiple (or all) pages.
An application process is a centralized PL/SQL block (or other process type) that you define in Shared Components. Instead of duplicating the same logic in page-level processes on many pages, you create it once here and specify when it should run (e.g., before header, after submit, etc.). This promotes DRY (Don’t Repeat Yourself) principles.
Example: You want to log every page view for auditing.
- Create an Application Process named LOG_PAGE_VIEW.
- Type: Execute Code (PL/SQL).
- Point: On Load: Before Header.
- PL/SQL Code:
INSERT INTO page_audit_log (user_name, page_id, view_timestamp)VALUES (APEX_APPLICATION.G_USER, :APP_PAGE_ID, SYSDATE);
This log entry will be created automatically on every page load without adding code to each page.
How to Create an Application Process
- Go to Shared Components → Application Processes.
- Click Create.
- Enter Name, Sequence, and choose Point (e.g., On Load: Before Header).
- Enter your PL/SQL
- Optionally add Conditions, Authorization, or Error Message.
Let’s Build a Client-Switching Example :
The requirement is to allow users to switch from one client to another. Once the client is switched, the application should automatically display all projects associated with the selected client in the Client Projects Classic Report.
Please refer to the following video to see the expected behavior.
CREATE TABLE "AP_CLIENTS"
   (	"ID" NUMBER,
	"NAME" VARCHAR2(100),
	 CONSTRAINT "AP_CLIENT_PK" PRIMARY KEY ("ID")
  USING INDEX  ENABLE
   ) ;


insert into ap_clients(id, name) values (100, 'iLiOLP Ltd Comp');
insert into ap_clients(id, name) values (200, 'iDoLOP Comp Ins');

CREATE TABLE "AP_PROJECTS"
   (	"ID" NUMBER,
	"NAME" VARCHAR2(100),
	"BUDGET" NUMBER(5,0),
	"CLIENT_ID" NUMBER,
	 CONSTRAINT "AP_PROJECT_PK" PRIMARY KEY ("ID")
  USING INDEX  ENABLE
   ) ;

ALTER TABLE "AP_PROJECTS" ADD CONSTRAINT "AP_PROJECT_FK" FOREIGN KEY ("CLIENT_ID")
	  REFERENCES "AP_CLIENTS" ("ID") ENABLE;

insert into ap_projects(id, name, budget, client_id) values(1000, 'iOL - 1000', 23000, 100);
insert into ap_projects(id, name, budget, client_id) values(1001, 'iUL - 2000', 25000, 100);
insert into ap_projects(id, name, budget, client_id) values(1002, 'iWQ - 3000', 26000, 100);
insert into ap_projects(id, name, budget, client_id) values(1003, 'iKL - 4000', 27000, 100);
insert into ap_projects(id, name, budget, client_id) values(1004, 'iAS - 5000', 29000, 100);
insert into ap_projects(id, name, budget, client_id) values(1005, 'iYU - 1000', 29000, 200);
insert into ap_projects(id, name, budget, client_id) values(1006, 'iIL - 2000', 30000, 200);
insert into ap_projects(id, name, budget, client_id) values(1007, 'iQA - 3000', 31000, 200);
insert into ap_projects(id, name, budget, client_id) values(1008, 'iPA - 4000', 32000, 200);
insert into ap_projects(id, name, budget, client_id) values(1009, 'iFG - 5000', 33000, 200);
Create the Client Project Management Web Application in Oracle APEX
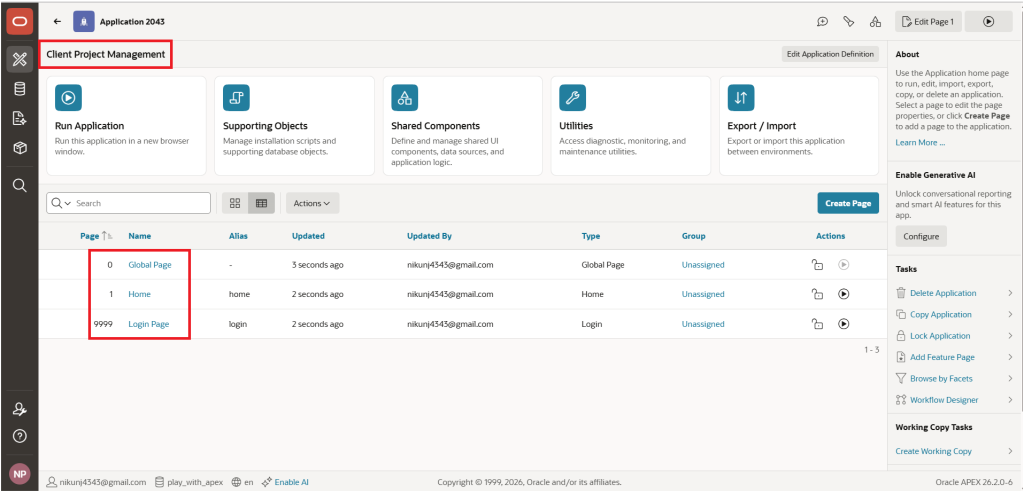
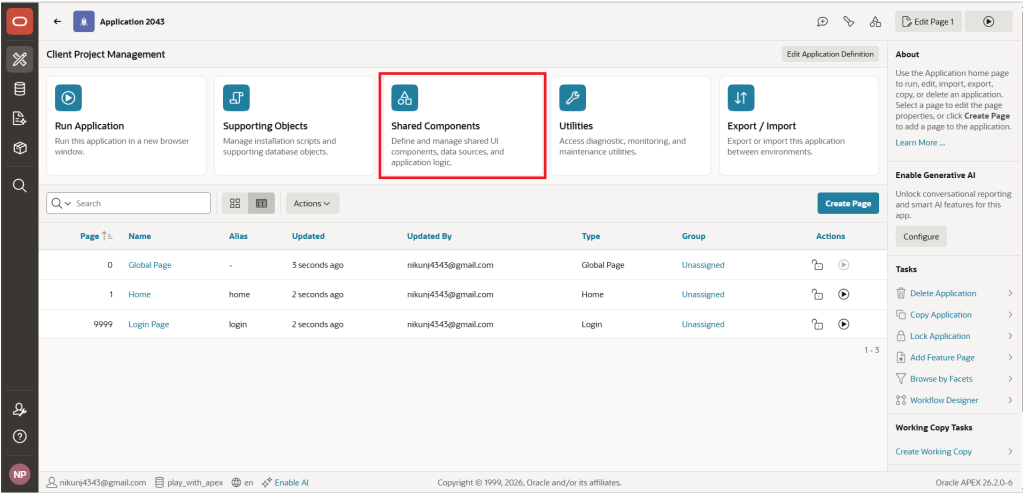
Before we start working on the application’s Home page, navigate to the Shared Components section of the Client Project Management application, as shown below.
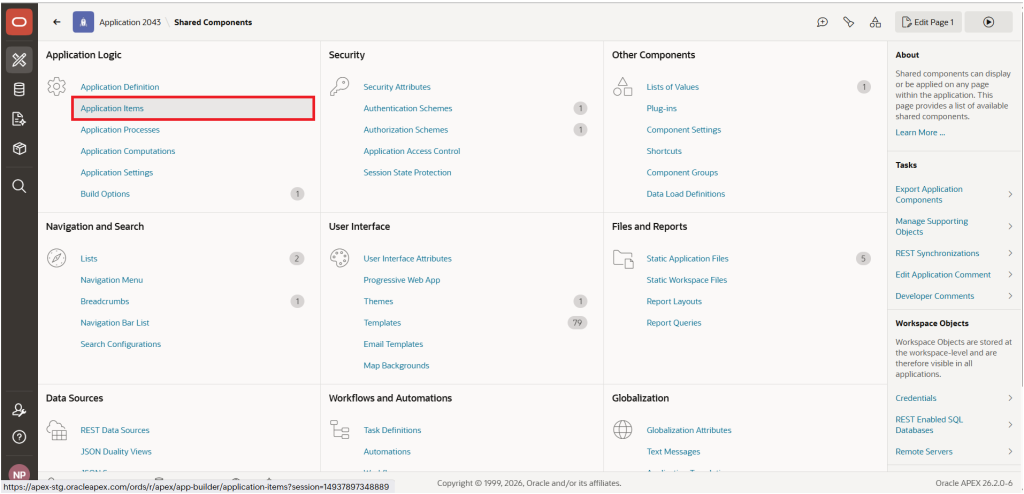
In the Shared Components module, select Application Items under the Application Logic section, as shown in the image below.
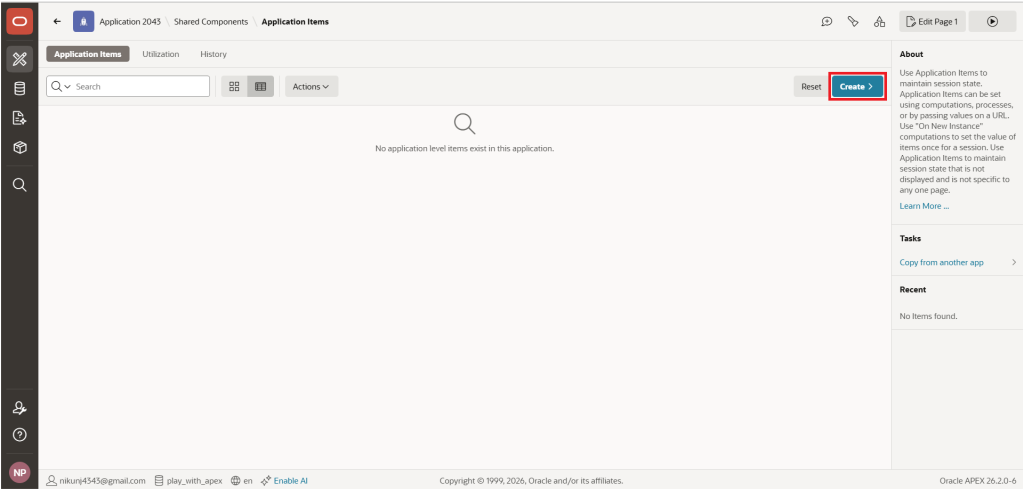
Click the Create button to open the Application Item configuration screen.
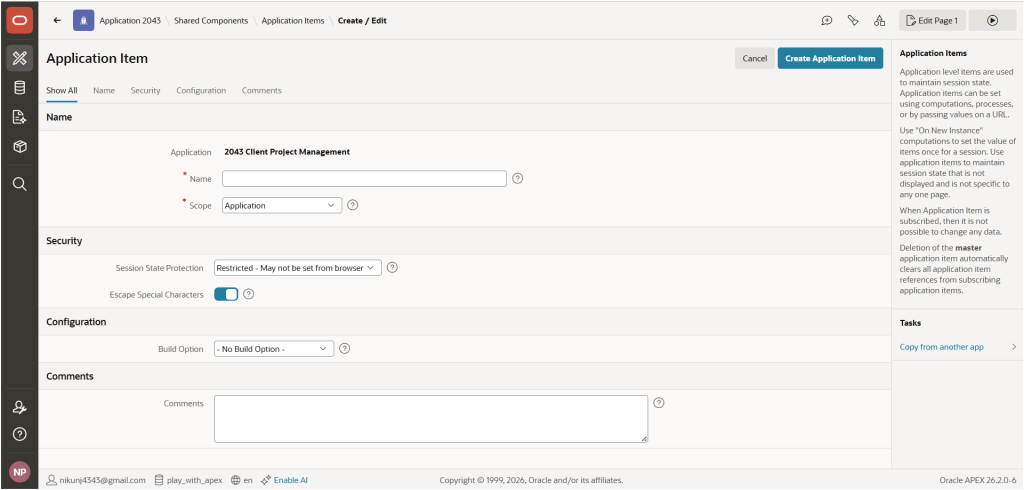
The Add Application Item screen will appear as shown below.
Enter CLIENT_NAME in the Name field, then click the Create Application Item button.
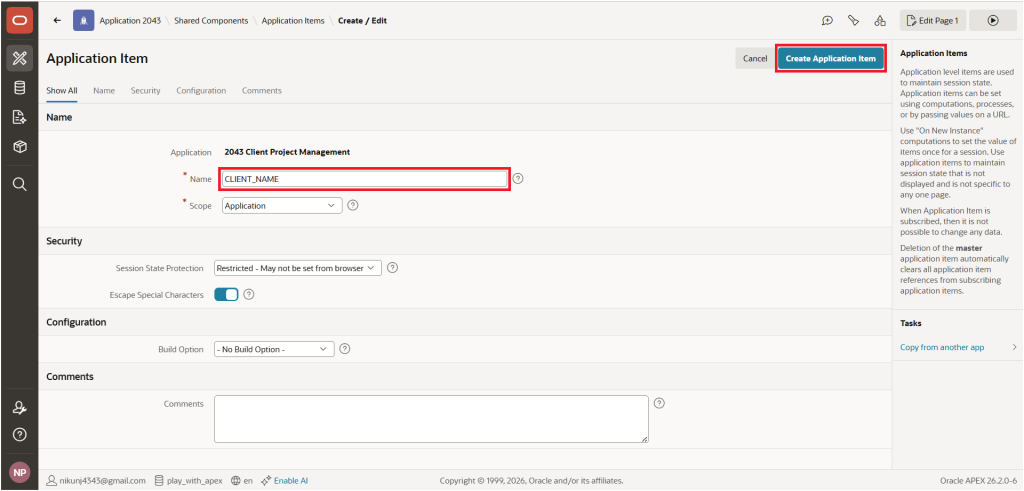
This will create the CLIENT_NAME application item in the Application Items module. You can use this application item on any page or in an application process within the APEX application.
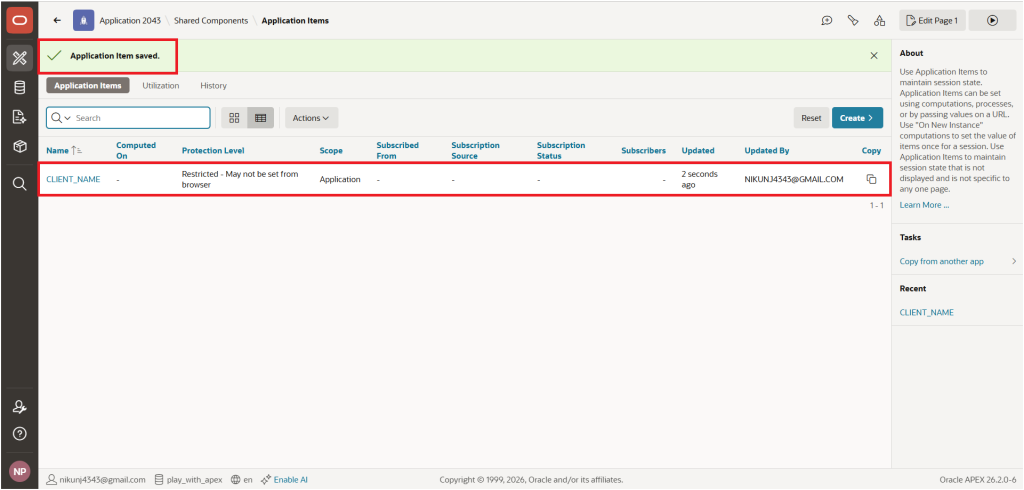
We will use the CLIENT_NAME application item in the Set Client Name application process later in this tutorial.
To create an APEX application process, navigate to the Shared Components home page and select Application Processes.
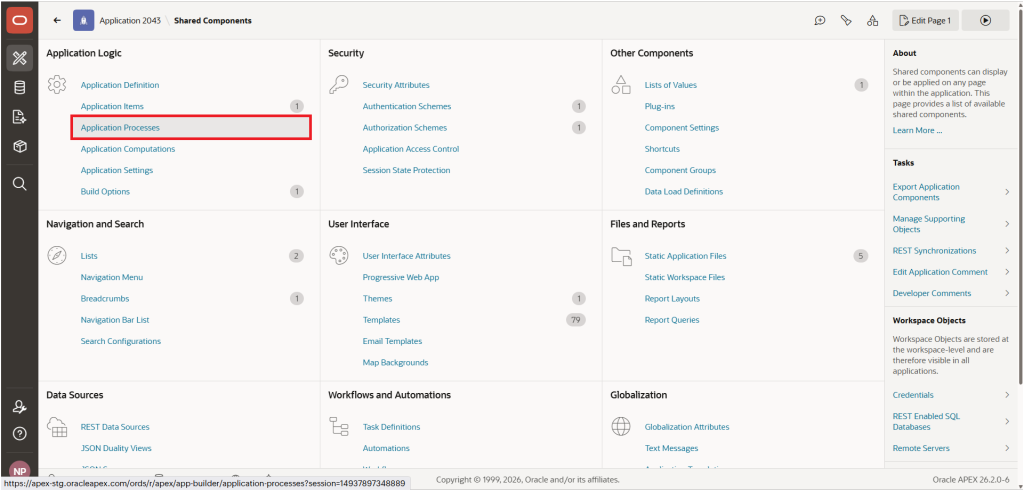
This will open the Application Processes page, where you can click the Create button to create a new application process.
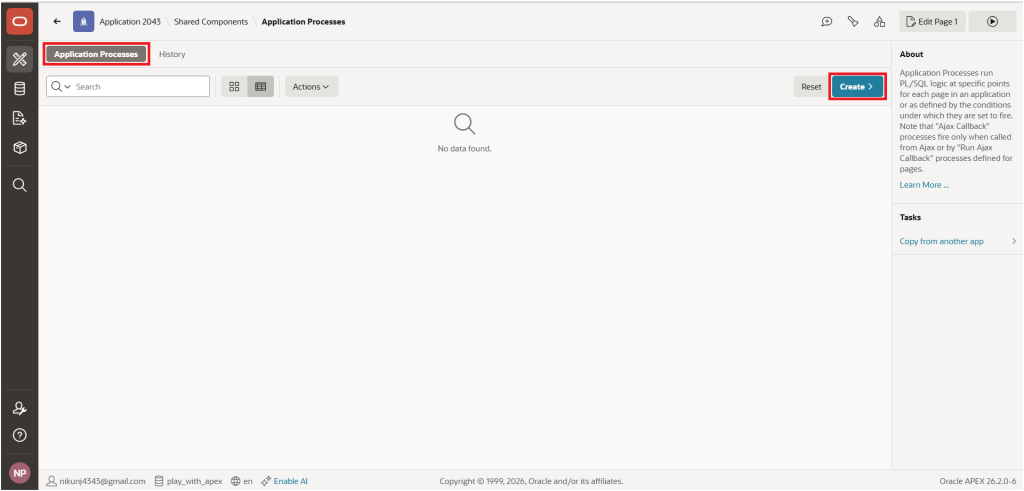
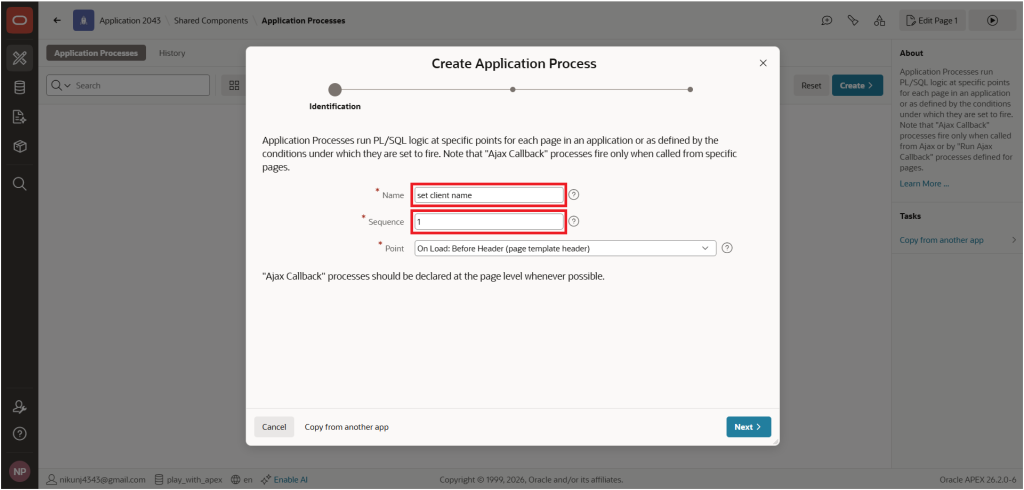
Now, click the Create button. This will open the Create Application Process dialog, which contains the Identification section with the Name, Sequence, and Point attributes.
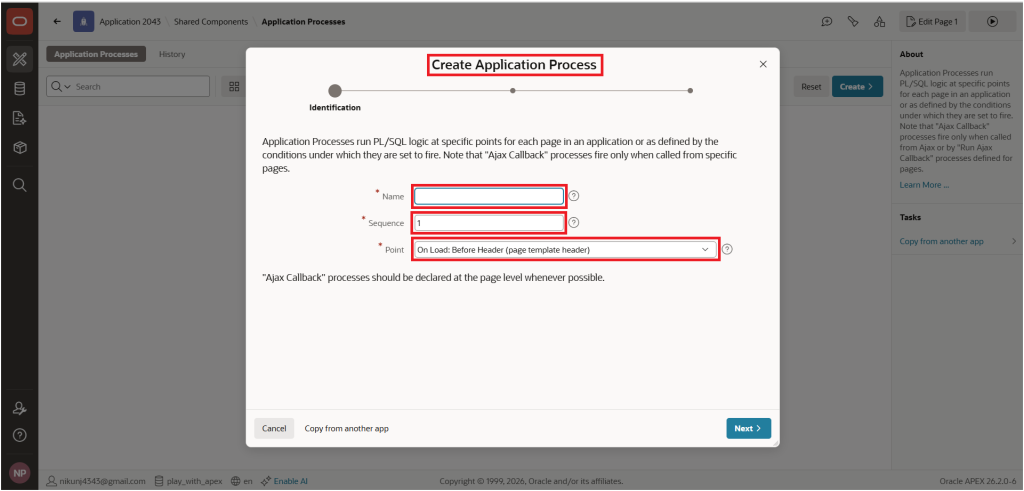
Enter Set Client Name as the application process Name, then click the Next button.
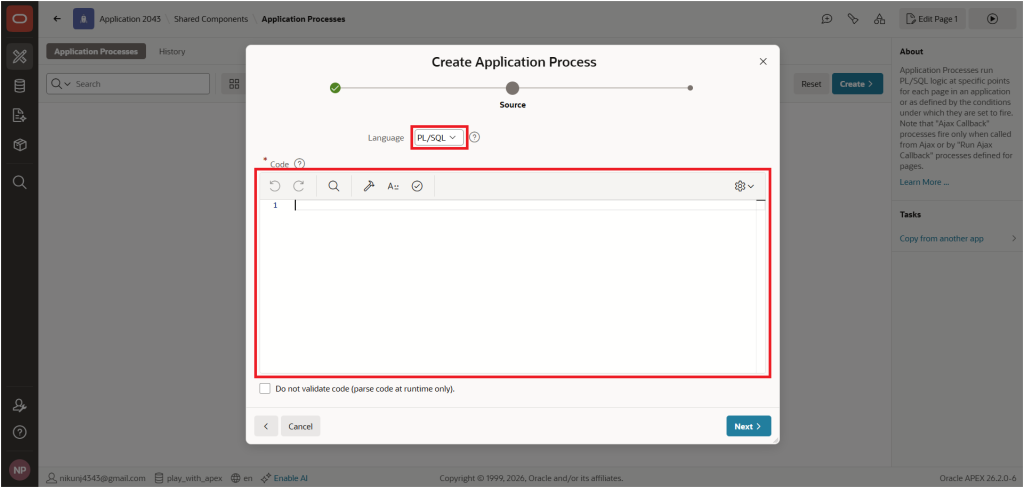
This will open the Source dialog page, where Language is set to PL/SQL. The Code text field is provided for entering the PL/SQL code that will be executed by the application process.
Enter the following PL/SQL code for the Set Client Name application process, then click the Validate button to check for any syntax errors.
If the PL/SQL code is valid and no syntax errors are found, click the Next button to continue.
if :CLIENT_NAME is null
then
    select name into :client_name
    from ap_clients
    where id = 100;
end if;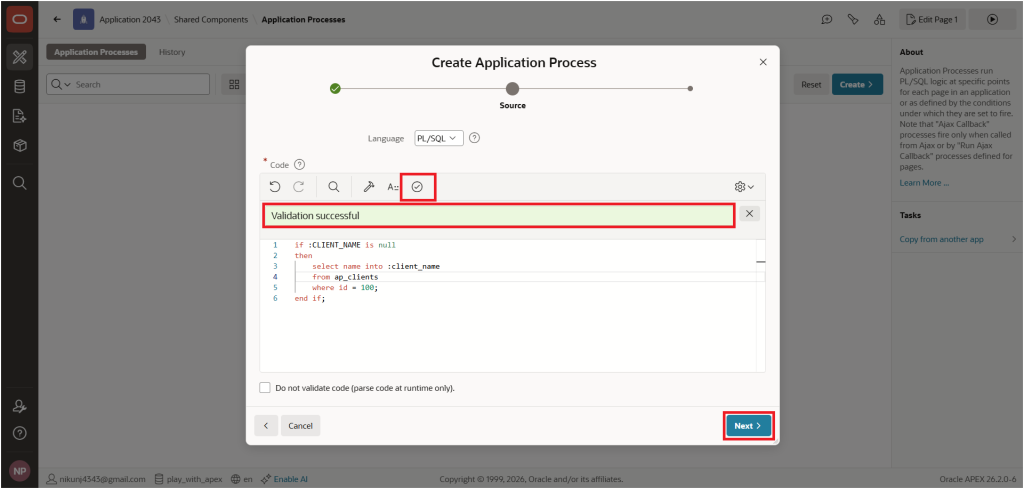
This will take you to the final Conditionality page, where you can specify a Condition Type for the application process.
For this example, we do not need to define any condition. Leave Condition Type set to – Select Condition Type –, then click the Create Process button to create the Set Client Name application process.
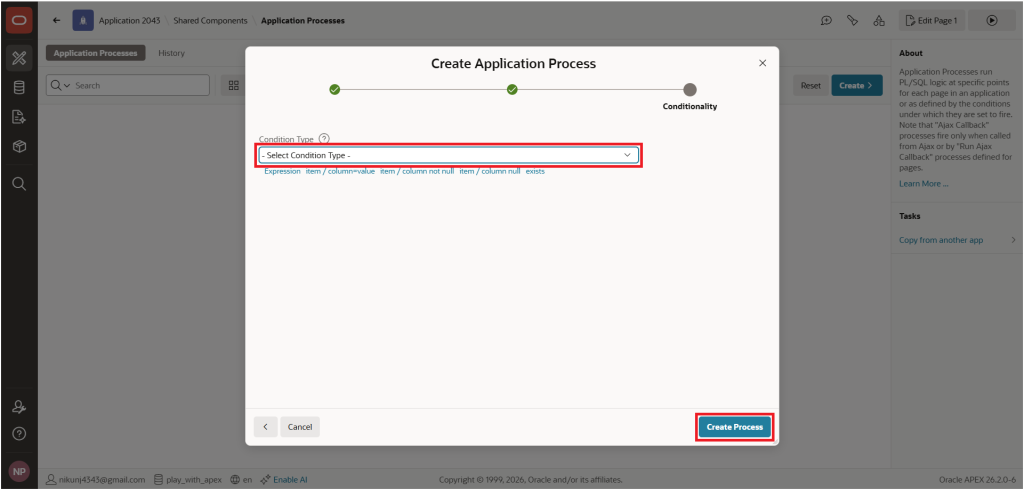
This will add the Set Client Name application process, which uses the CLIENT_NAME application item to store the client name.
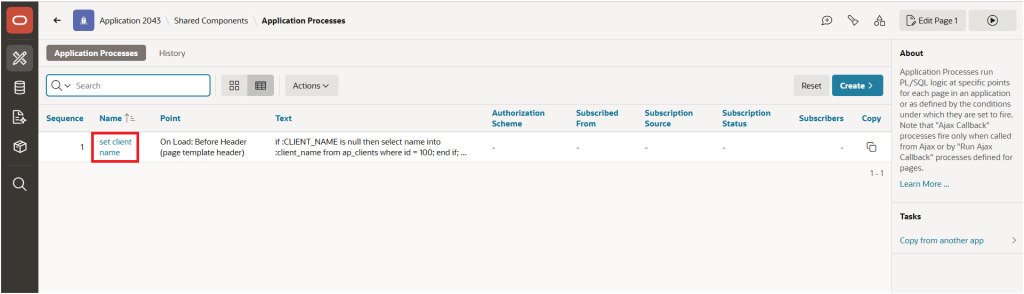
So far, we have created the Application Item (CLIENT_NAME) and the Application Process (Set Client Name). We will now use these two APEX components across different pages to implement the required functionality.
Next, we will create a Client Name entry in the Application Navigation Bar. Later, users will be able to use this client name to switch from one client to another.
Please refer to the following screen to see how this functionality will work.
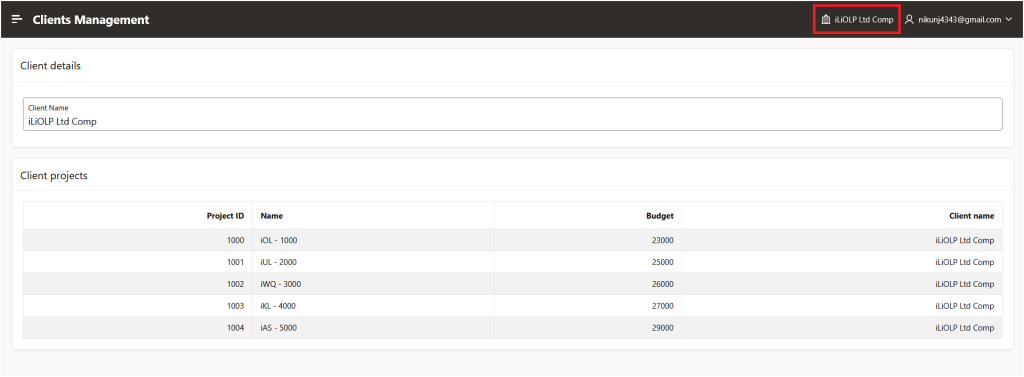
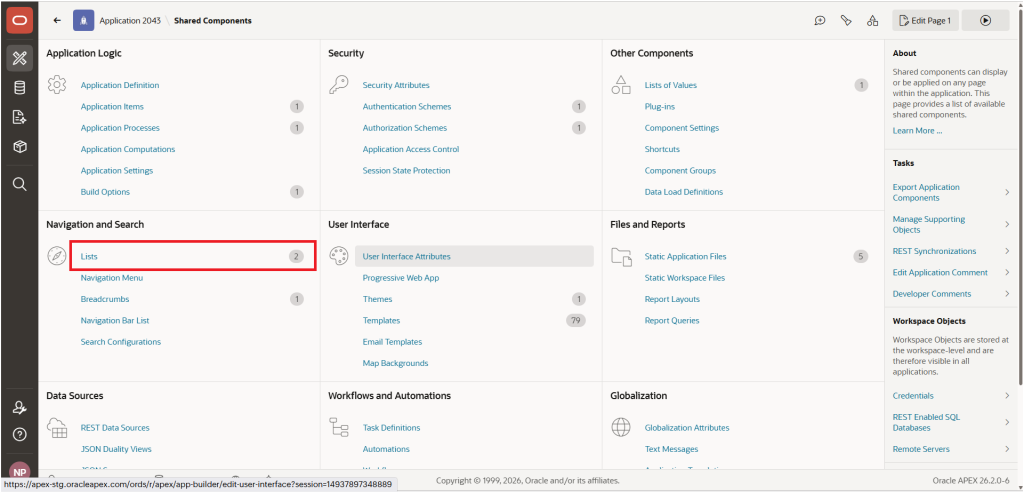
To add this functionality, navigate to Shared Components. Under the Navigation and Search section, click the first option, Lists.
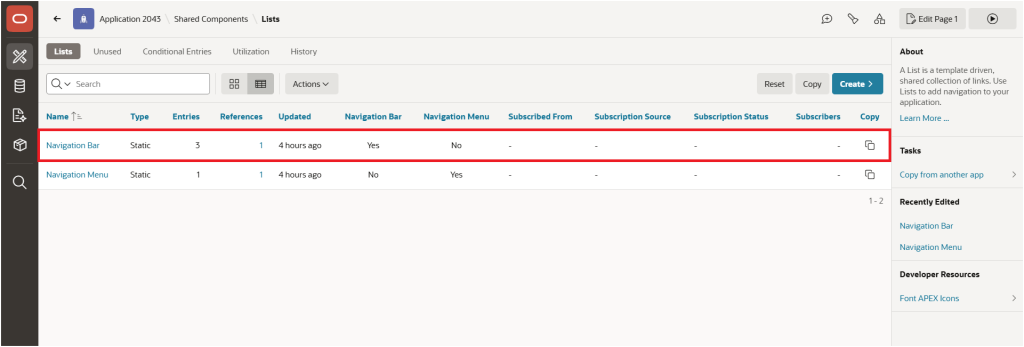
This will open the Lists page, which contains two list options: Navigation Bar and Navigation Menu.
Select the first option, Navigation Bar, by clicking it.
This will open the List: Navigation Bar page, which displays the default list entries.
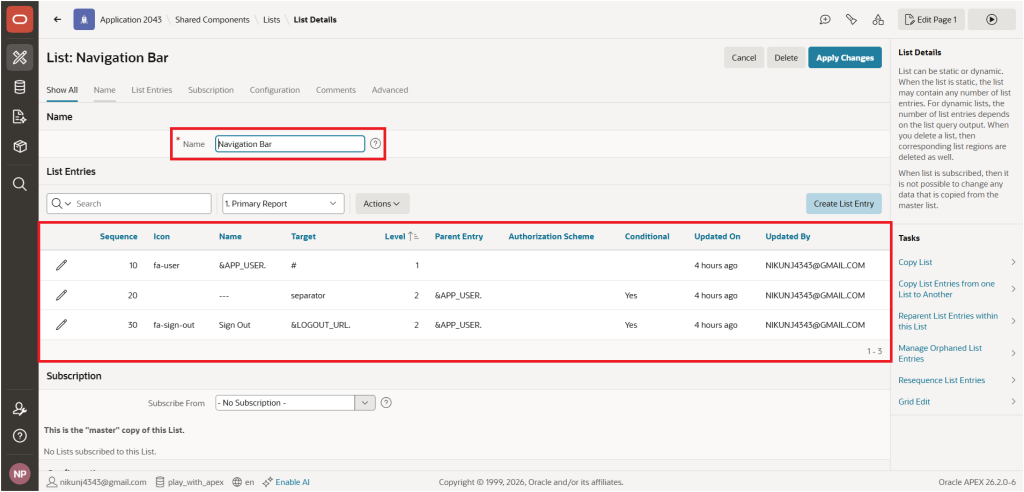
We will add one more list entry to this list by clicking the Create List Entry button.
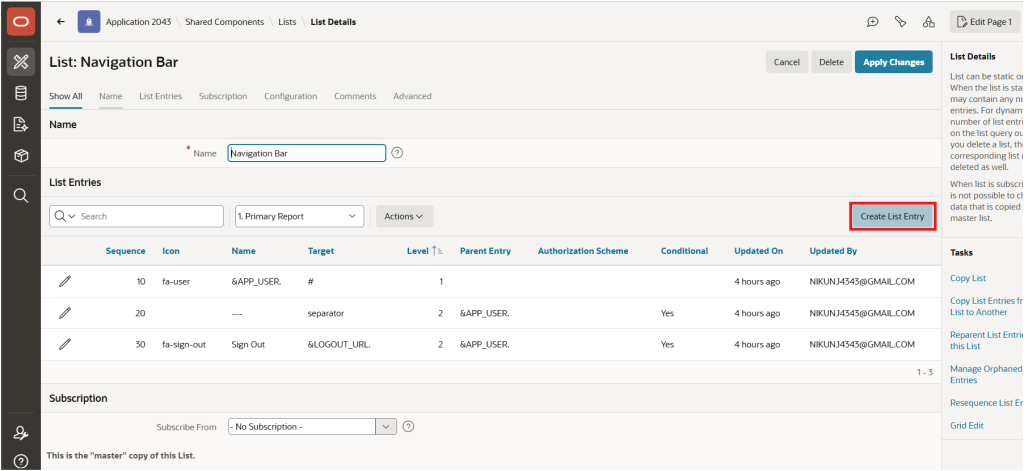
Although the List Entry configuration page contains several sections, only these three sections are relevant to our example: Entry, Target, and Advanced.
Entry Section
In the Entry section, configure the following properties:
- List Entry Label: Enter
&CLIENT_NAME.. This references the CLIENT_NAME application item, allowing the current client name to be displayed dynamically in the Navigation Bar. - Sequence: Set the sequence to 5. Since this is the smallest sequence number among the Navigation Bar entries, the CLIENT_NAME entry will appear in the first position.
- Icon: Set the icon to fa-building-o.
Target Section
In the Target section, configure the following:
- Page: Set the page to 2. We will create this page later for the Switch Client functionality.
- Static ID: In the Advanced section, set the Static ID to CLIENT_NAME. This is a mandatory field for this configuration.
Advanced Section
In the Advanced section, set the Static ID to CLIENT_NAME. This field is mandatory for this configuration.
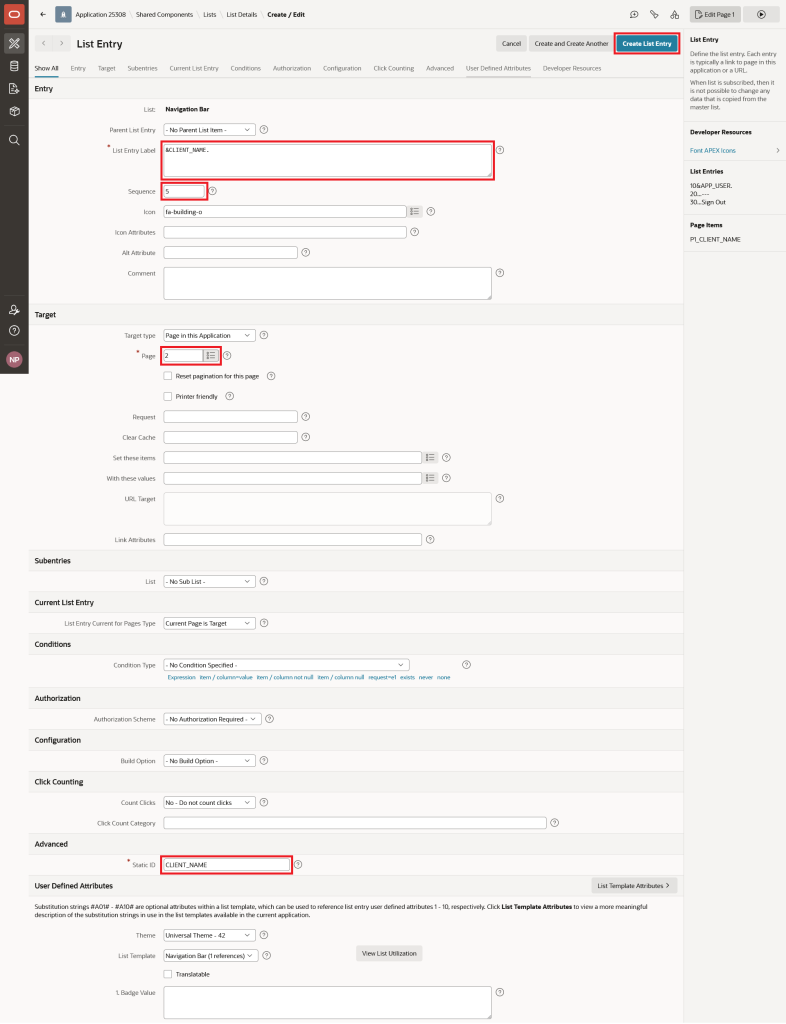
We have successfully added the List Entry to the application’s Navigation Bar.
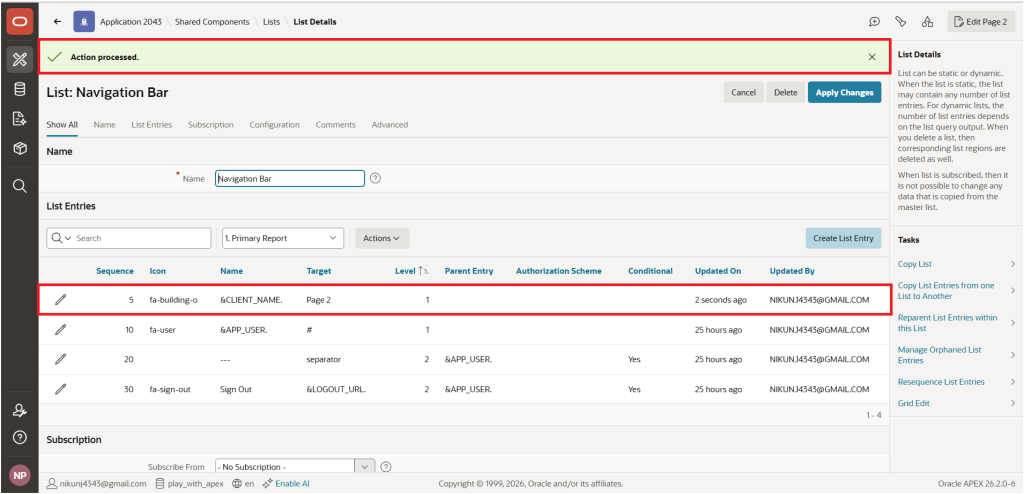
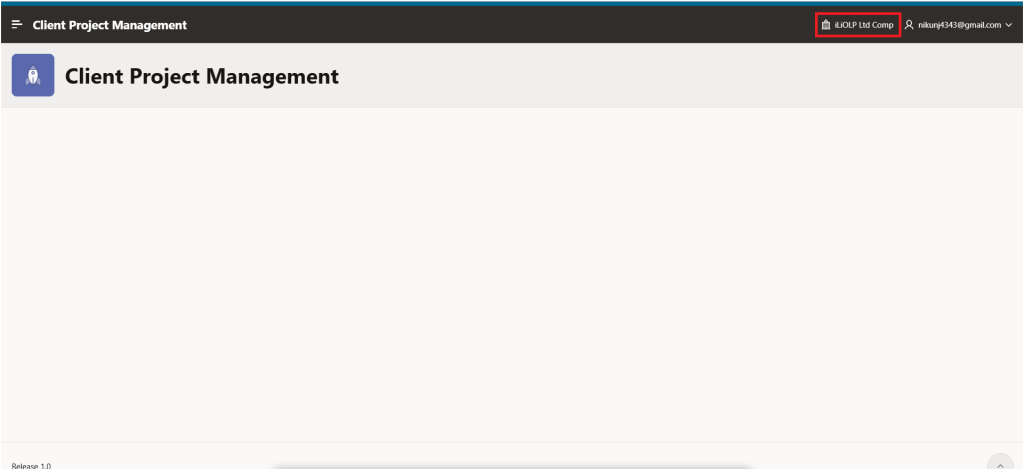
After completing these settings, the Client Name (iLiOLP Ltd Comp) option will appear on the right side of the application’s Navigation Bar.
Adding the Switch Client Functionality
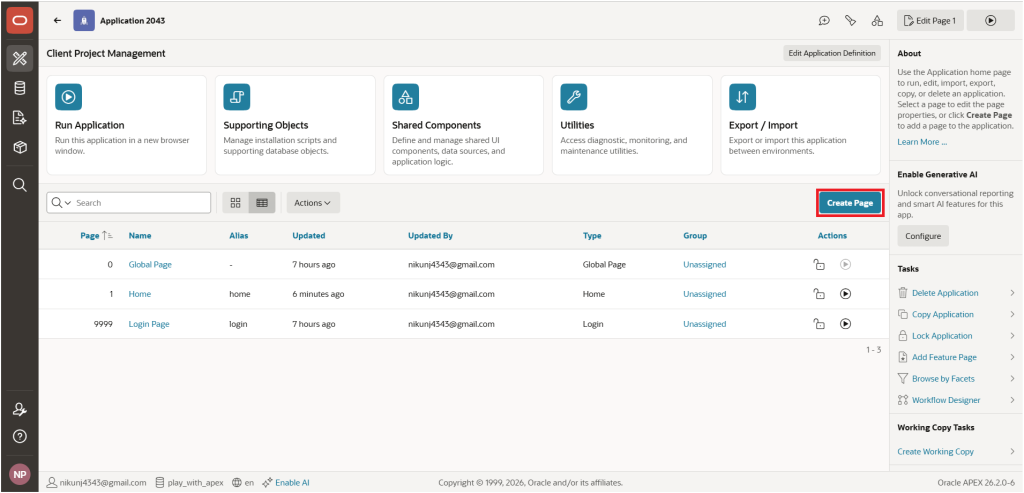
To implement this functionality, create a new page from the Client Project Management application’s home page by clicking the Create Page button.
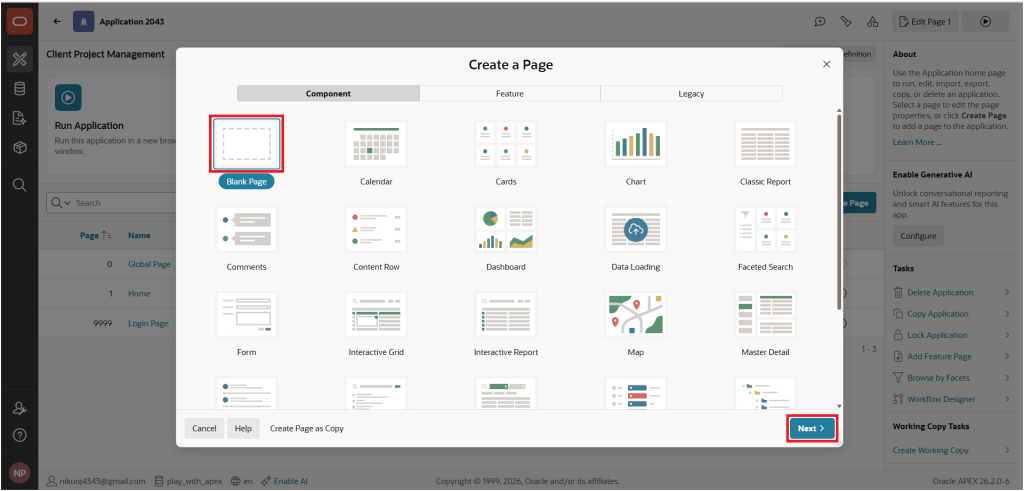
This will open the Create a Page dialog with Blank Page selected by default. Click the Next button to continue.
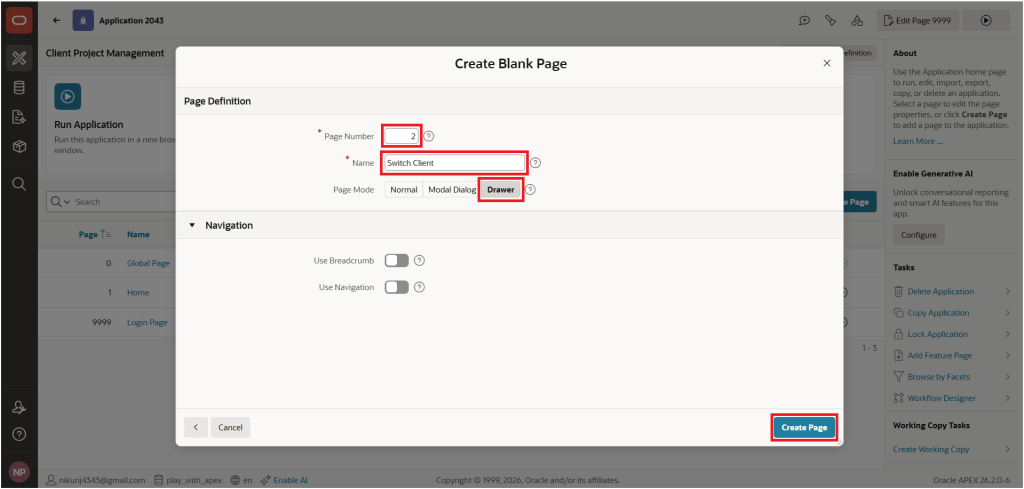
The next step will open the Create Blank Page screen, which contains the Page Definition and Navigation sections.
Set the following properties:
- Page Number: 2
- Name: Switch Client
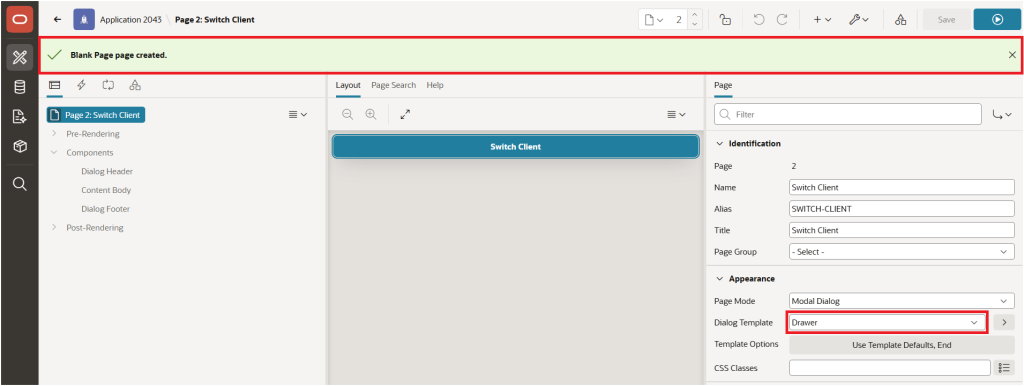
- Page Mode: Drawer
- Use Breadcrumb: Off
- Use Navigation: Off
After configuring these properties, click the Create Page button to create the page.
We can now see the newly created page with the name Switch Client.
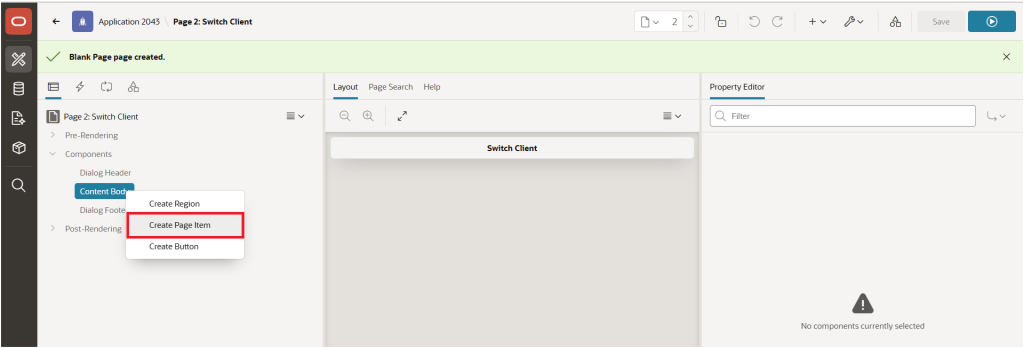
Now, right-click the Content Body component and select Create Page Item from the list.
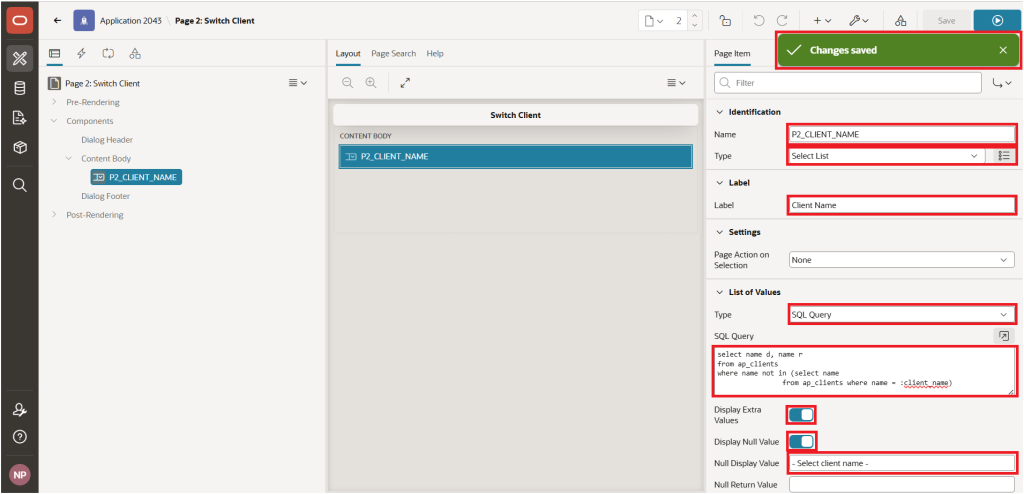
Now, create a P2_CLIENT_NAME Select List item and configure the following properties:
- Name:
P2_CLIENT_NAME - Type: Select List
- Label: Client Name
- Type: SQL Query
Use the following SQL Query:
SELECT name d, name r
FROM ap_clients
WHERE name NOT IN ( SELECT name
                    FROM ap_clients
                    WHERE name = :CLIENT_NAME )
Configure the remaining properties as follows:
- Display Extra Values: On
- Display Null Value: On
- Null Display Value:
- Select client name -
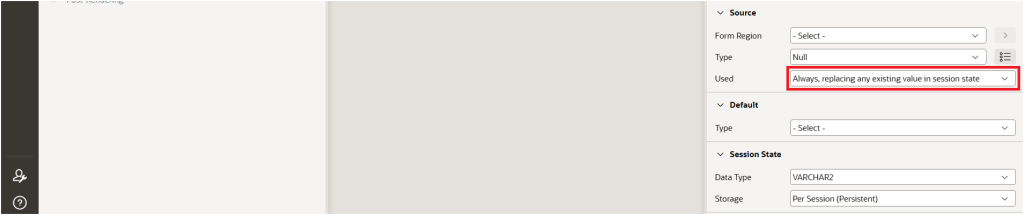
In the Source section: set Used property
- Used: Always, replacing any existing value in session state
Finally, click Save to save the changes.
On Page 2 – Switch Client, we will now add an Apply Changes button. This button will submit the page after the user selects a different client from the Client Name Select List item.
To create the button, right-click Content Body and select Create Button from the menu.
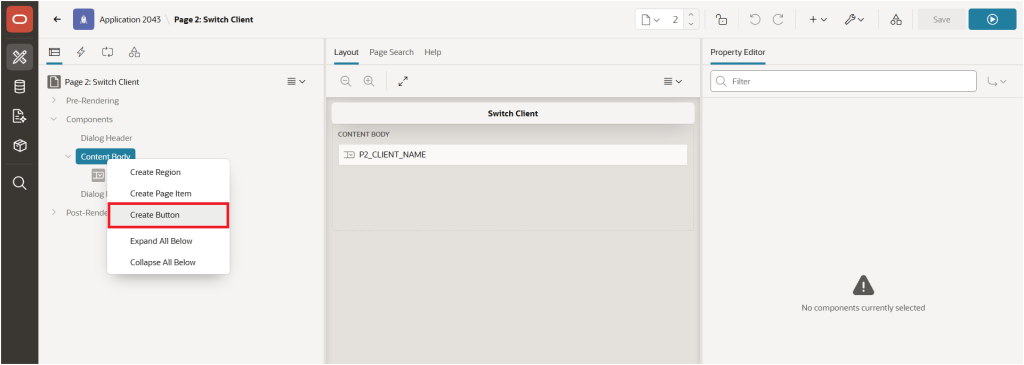
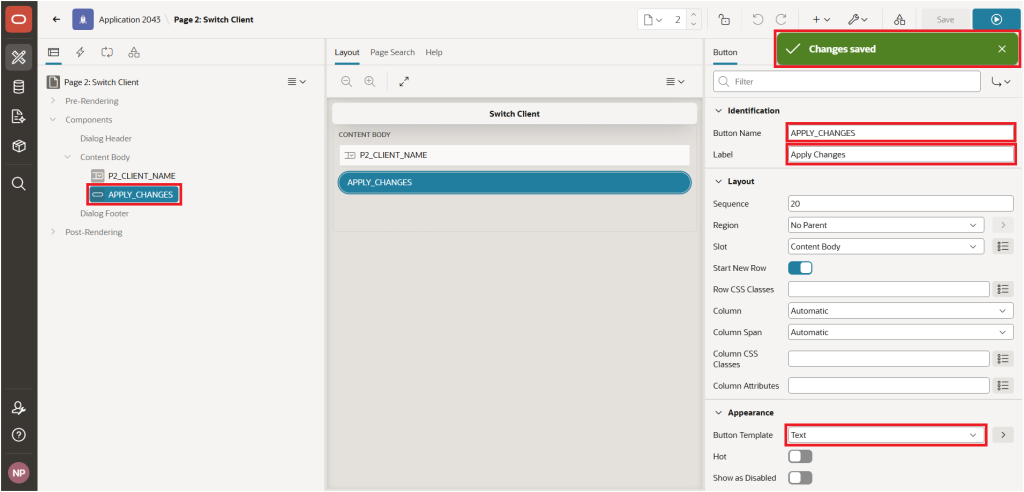
Now, configure the following properties for the Apply Changes button:
- Button Name:
APPLY_CHANGES - Label: Apply Changes
- Button Template: Text
- Action: Submit Page
After configuring these properties, click Save to save the changes.
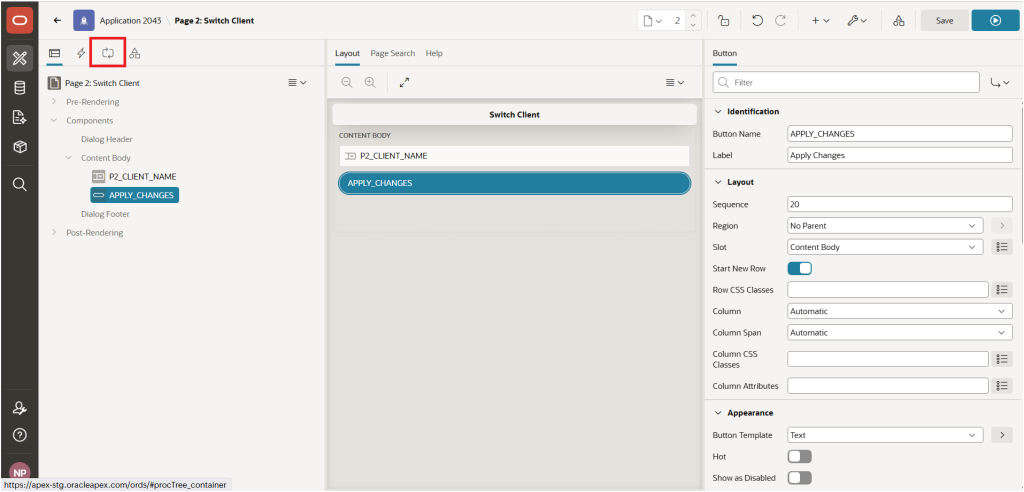
We will now create a Set Client Name page-level PL/SQL process to update the CLIENT_NAME application item with the client selected in the P2_CLIENT_NAME Select List.
This process will execute when the Apply Changes button submits the page.
To create the process, click the Processing option in the Rendering tree.
Now, right-click the Processing component and select Create Process from the menu.
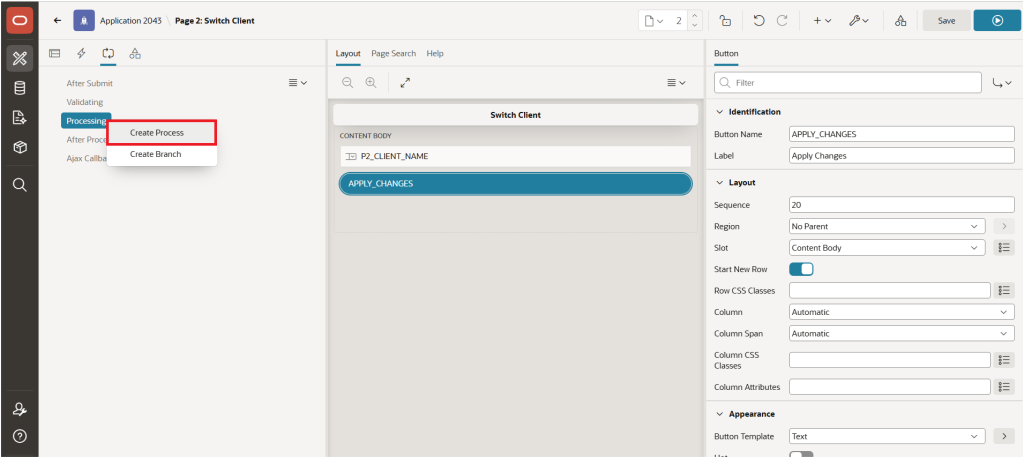
This will add a new Process with the following default values. An error indicator will also be displayed because some required properties have not yet been configured.
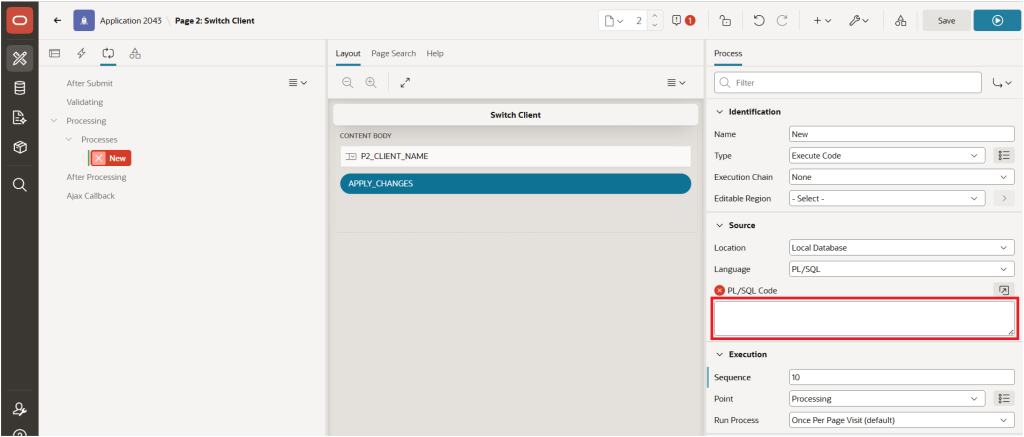
Configure the following properties for the page-level Set Client Name process:
- Name: Set Client Name
- Type: Execute Code
Enter the following PL/SQL code:
:CLIENT_NAME := :P2_CLIENT_NAME;This code assigns the client selected in the P2_CLIENT_NAME Select List to the CLIENT_NAME application item.
After configuring the process, click Save to save the changes.
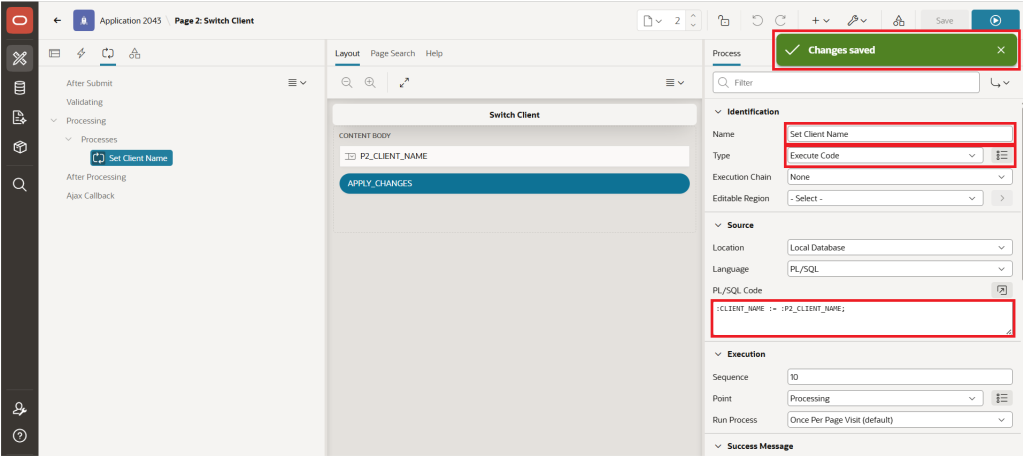
After clicking the Apply Changes button, we want to redirect the user to the Home page and display the newly selected client details.
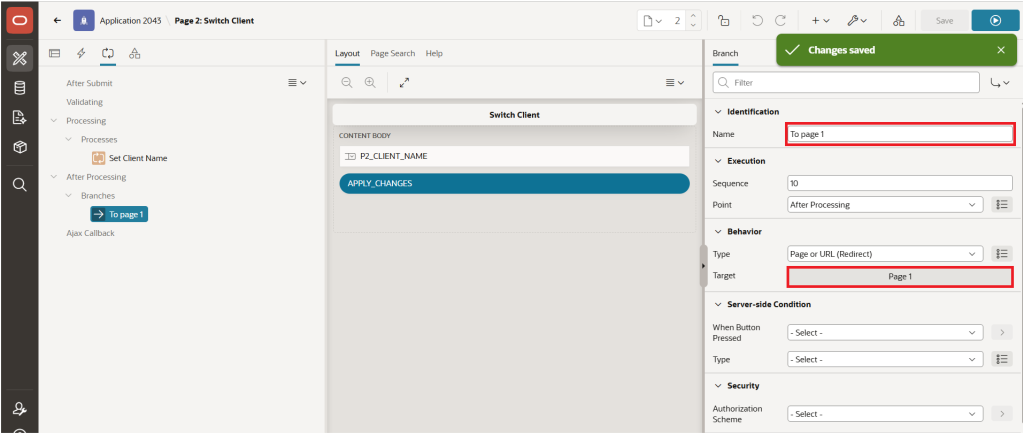
To achieve this, we need to create a new Branch component. Right-click the After Processing component and select Create Branch from the menu.
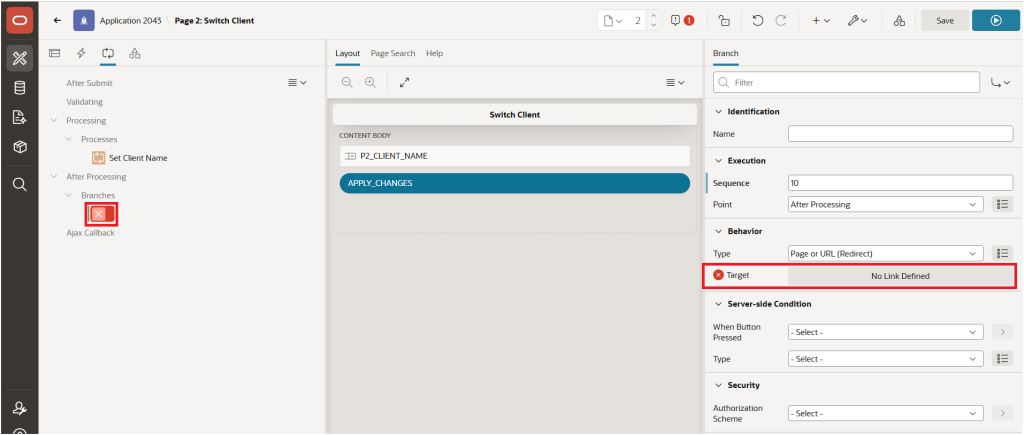
Next, configure the following properties for the Branch to redirect the user to the Home page after the client name is changed on the Switch Client page.
- Name: To Page 1
Click the Target property to open the Link Builder – Target dialog.
In the Target section, configure the following properties:
- Type: Page in this Application
- Page: 1
This will redirect the user to Page 1 (Home) after the Apply Changes button is clicked and the new client name is saved.
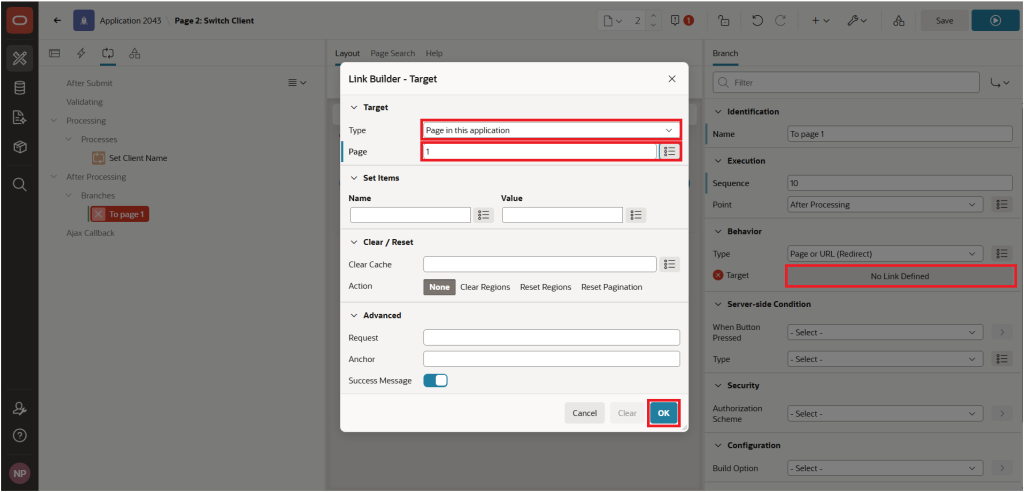
Click the OK button to save the Branch settings, as shown in the image above.
We will now display the Client Details along with the associated Client Projects on the Home page.
To achieve this, we will add two regions to the Home page:
- Client Details
- Client Projects
To begin, navigate to the Home page in the APEX Page Designer.
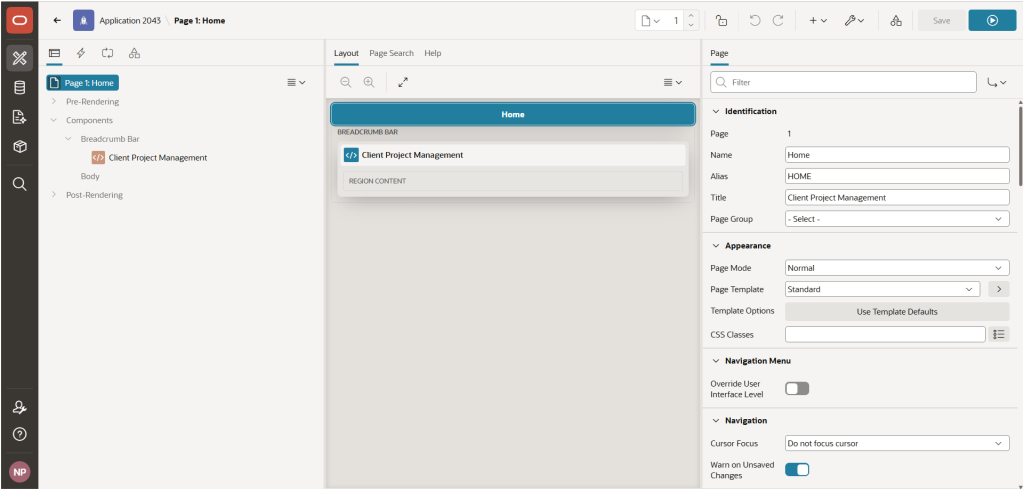
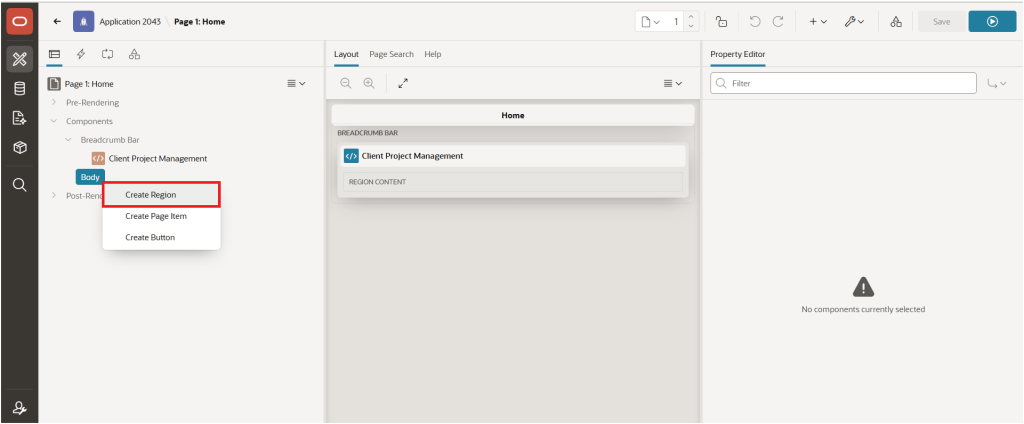
Now, right-click the Body option in the Page Rendering section and select Create Region from the menu.
This will add a new region with the Name set to New under the Body page component.
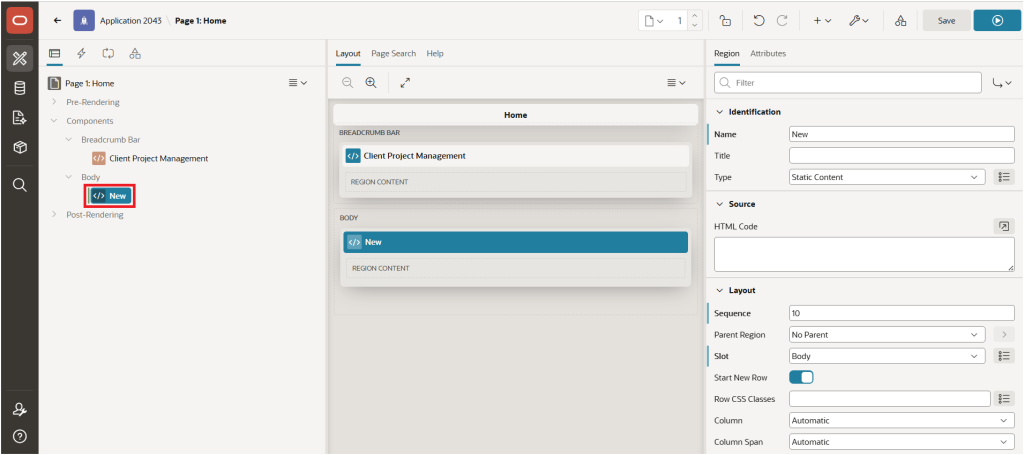
Now, set the Name property of the region to Client Details, then click the Save button to save the changes.
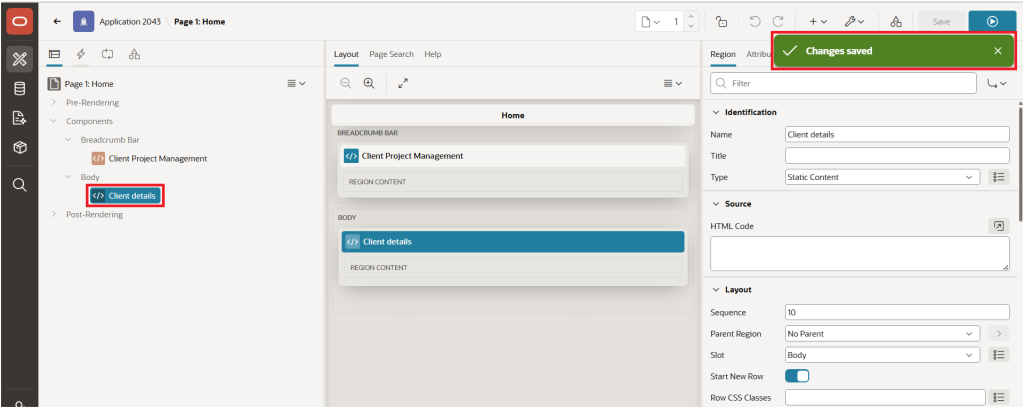
Now, we will add a page item to the Client Details region to display the client name selected through the Navigation Bar.
To create the page item, right-click the Client Details region and select Create Page Item from the menu.
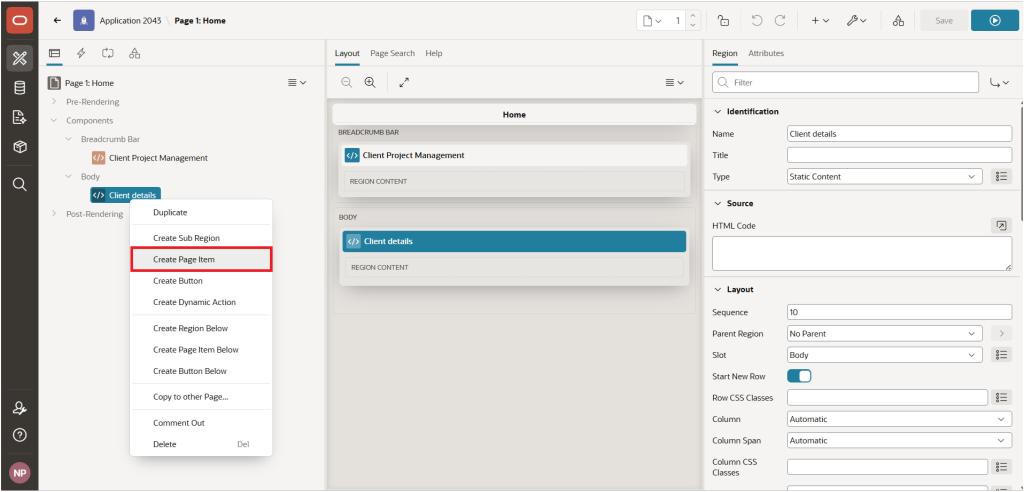
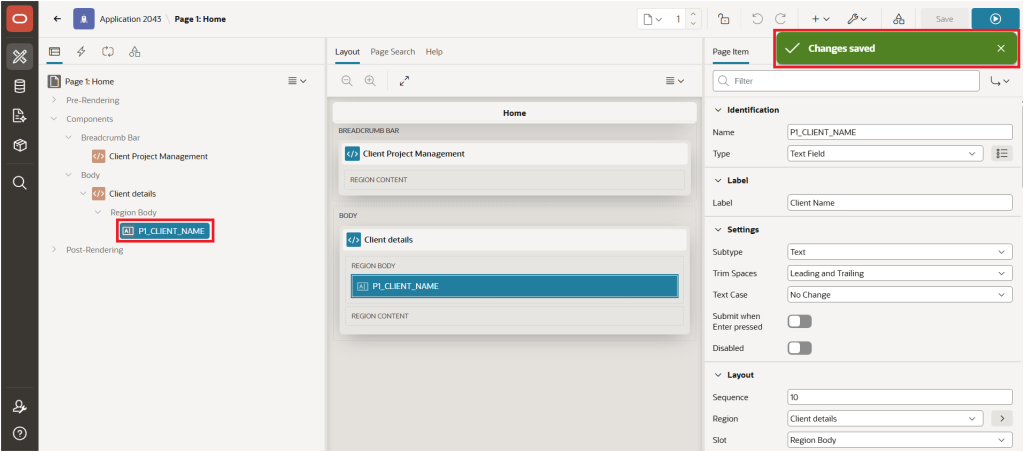
This will add a new page item with the default name P1_NEW.
Change the Name property to P1_CLIENT_NAME.
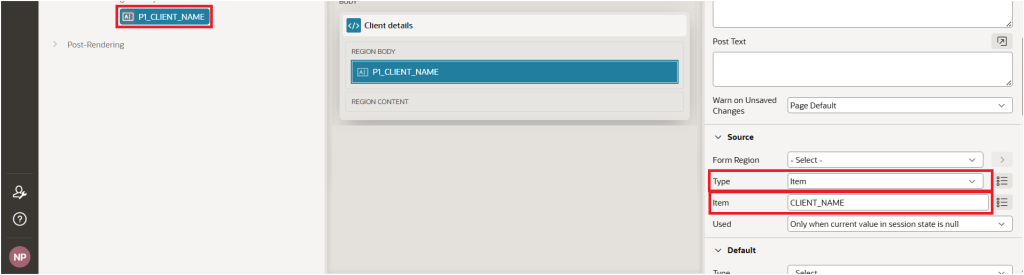
In the Source section, configure the following properties:
- Type: Item
- Item: CLIENT_NAME
- Used: Only when the current value in session state is null
Finally, click Save to save the changes.
Now, add another region to the Home page for displaying the projects associated with the selected client.
Set the following properties for the new region:
- Name: Client Projects
- Type: Classic Report
This Client Projects Classic Report will display the projects associated with the currently selected client.
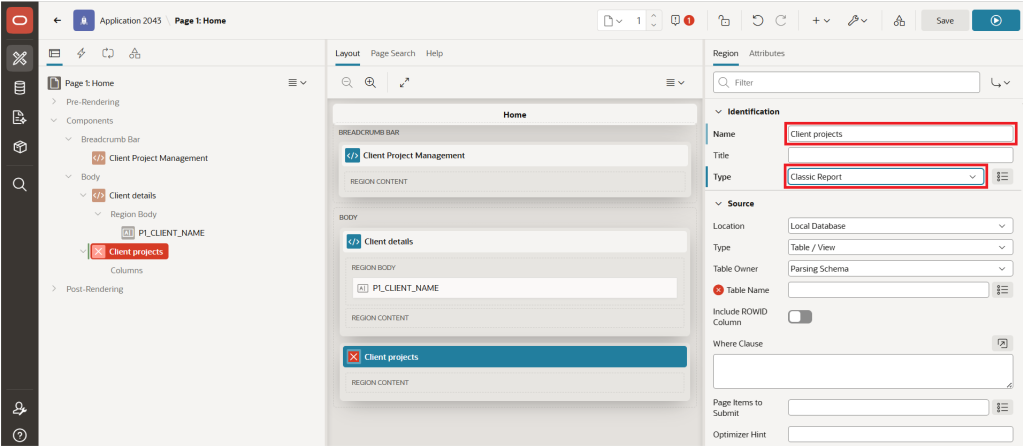
Now, change the Type from Table/View to SQL Query.
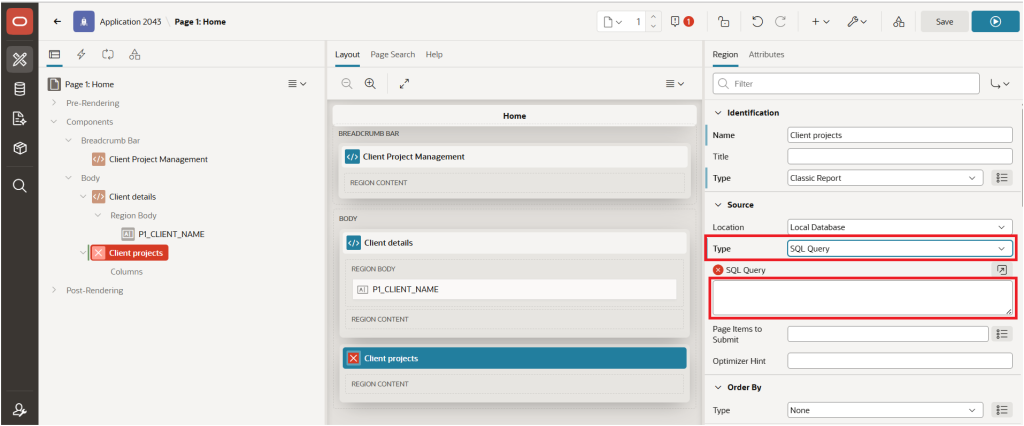
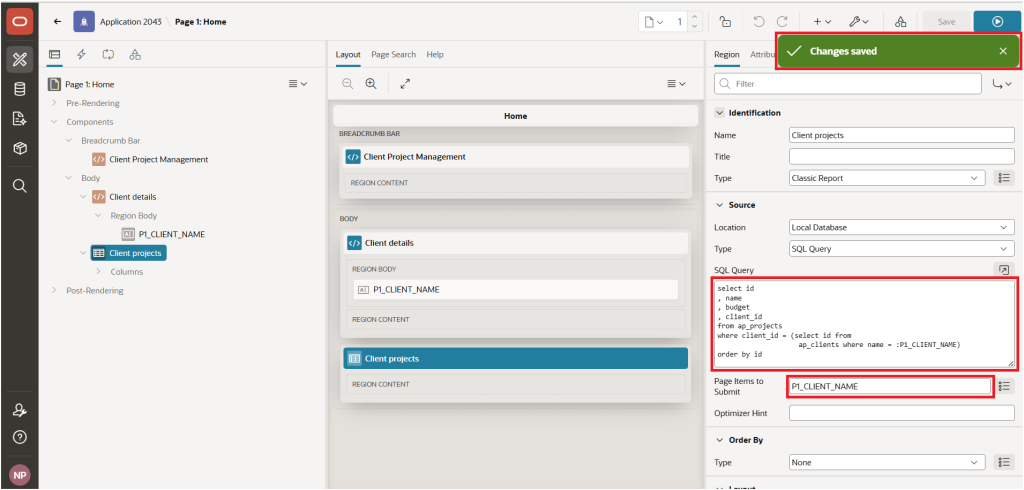
Now, enter the following SQL query in the SQL Query property.
select id
  , name
  , budget
  , client_id
from ap_projects
where client_id = (select id from
                   ap_clients where name = :P1_CLIENT_NAME)
order by id
Also, set the Page Items to Submit property to P1_CLIENT_NAME, then click Save to save the changes.
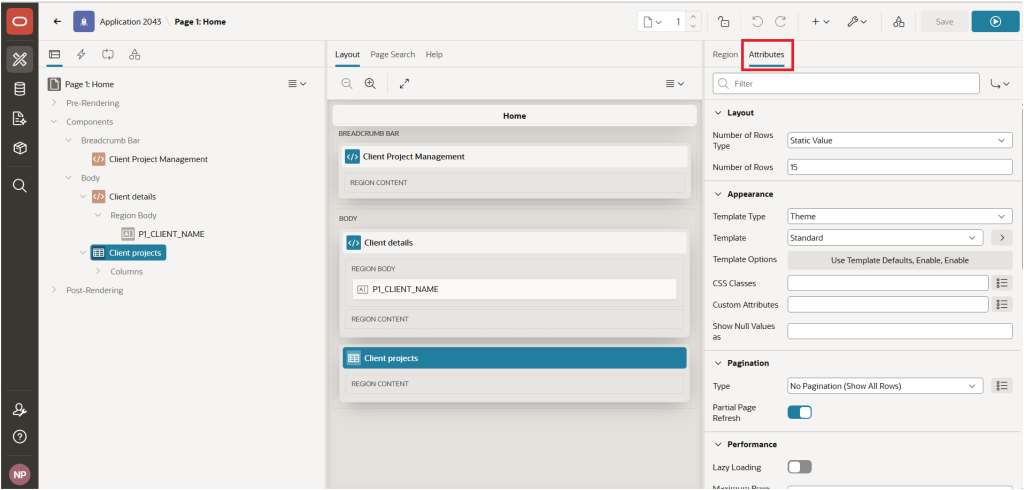
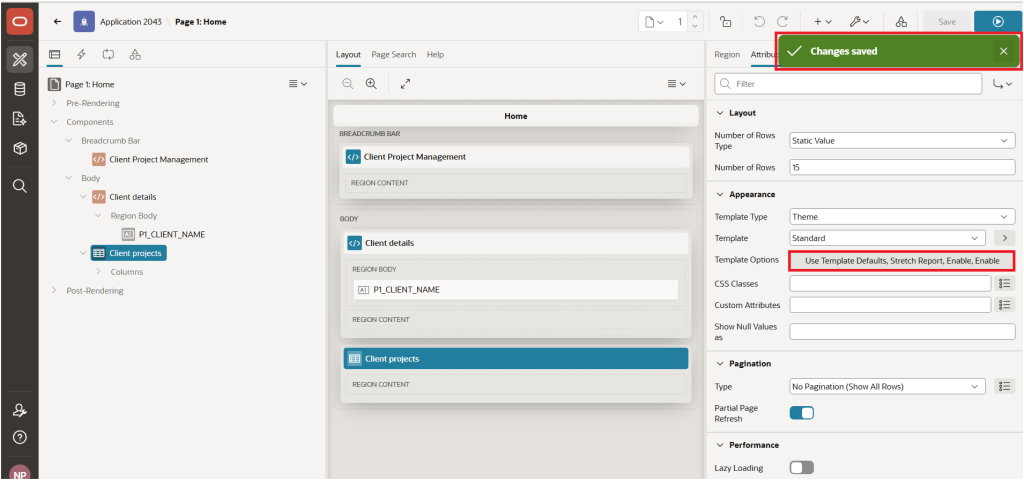
Now, navigate to the Attributes tab of the Client Projects Classic Report to configure its user interface.
Now, click the Template Options property to open the Template Options dialog.
In the dialog, enable Stretch Report. This will expand the report to use the available page width when the application is run.
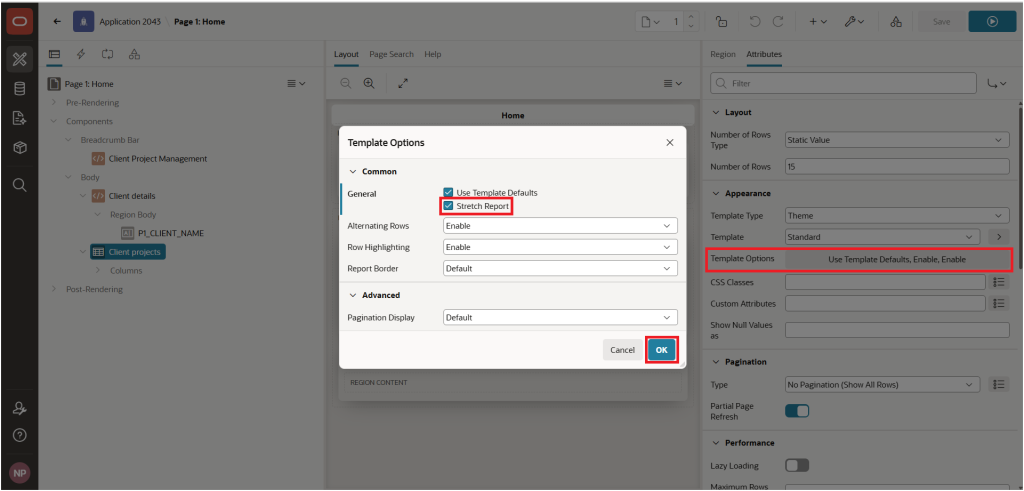
Click the OK button and then click Save to save the changes.
Now, select the CLIENT_ID column in the Client Projects Classic Report, as shown below.
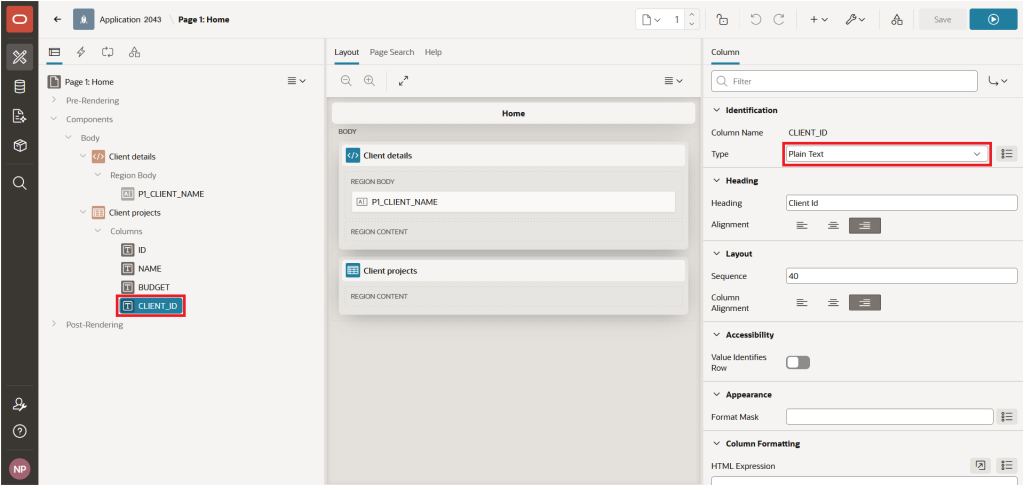
Change the Type from Plain Text to Plain Text (based on List of Values).
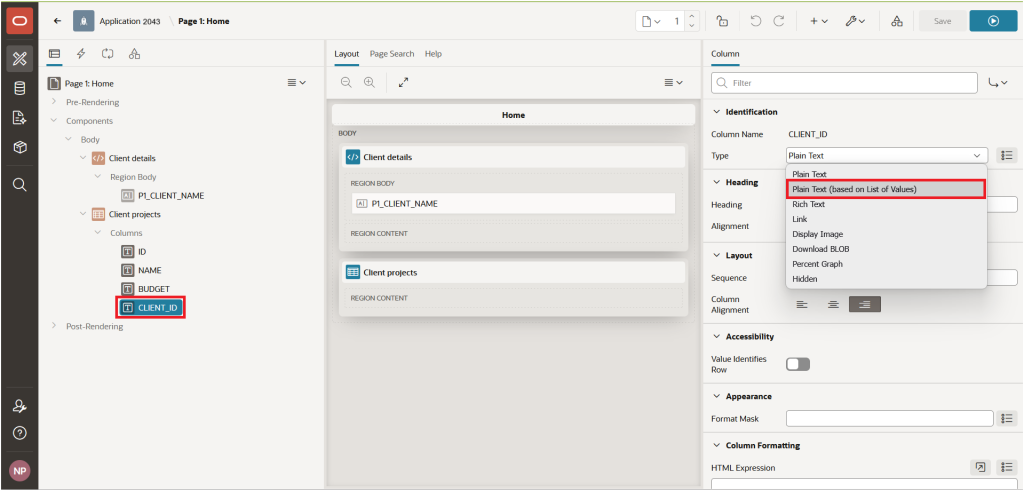
When you change the report column Type from Plain Text to Plain Text (based on List of Values), the List of Values section will be highlighted with an error because the Type property has not yet been configured.
In the List of Values section, set the Type property to SQL Query.
- Type : SQL Query
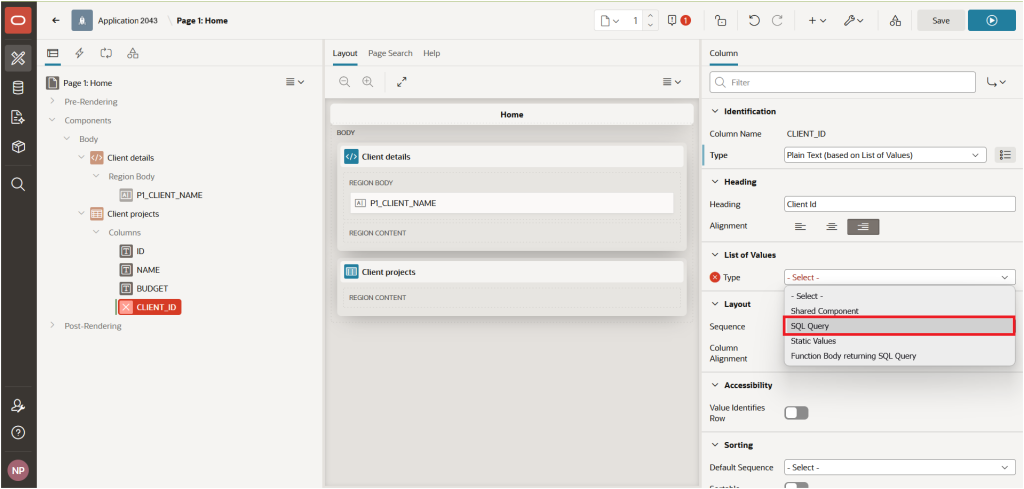
Once you select SQL Query as the Type, the SQL Query property will appear with an error indicator.
Enter the following SQL query to configure the List of Values and resolve the error:
select name d, id r
from ap_clients
Set the column Heading property to Client Name, then click Save to save the changes.
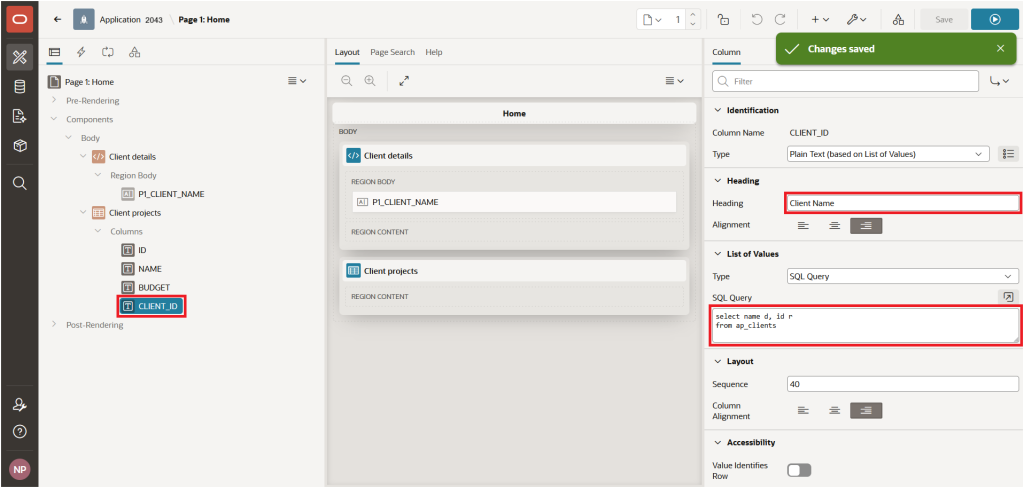
Now, run the application to verify the implementation and confirm that the output meets our requirements.
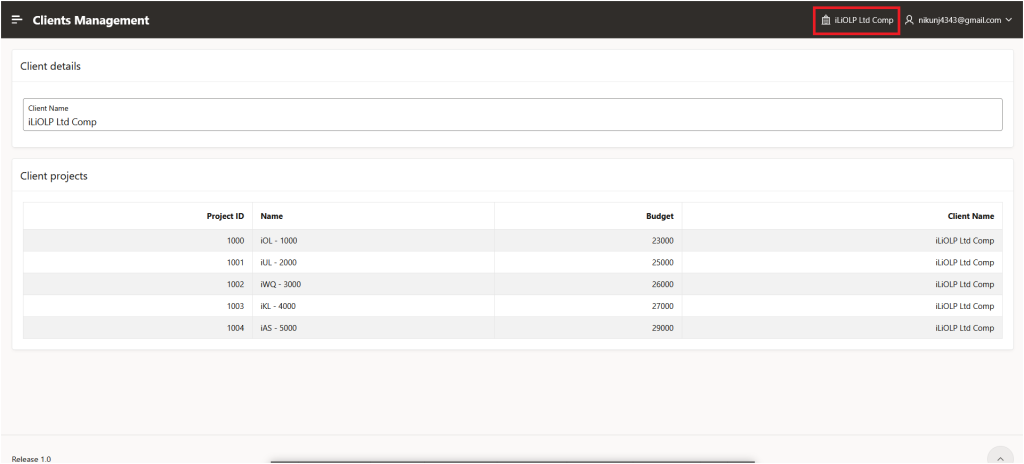
Now, click the iLiOLP Ltd Comp client name option in the application’s Navigation Bar.
Once you click the currently selected client name, the application will redirect you to the Switch Client page.
On this page, you can switch from one client to another according to the application requirements.
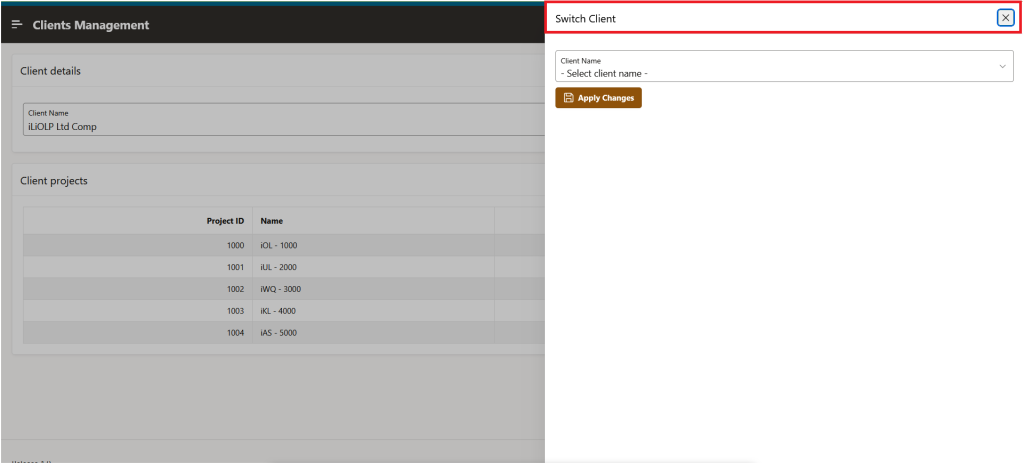
Now, select a different Client Name from the list of available clients.
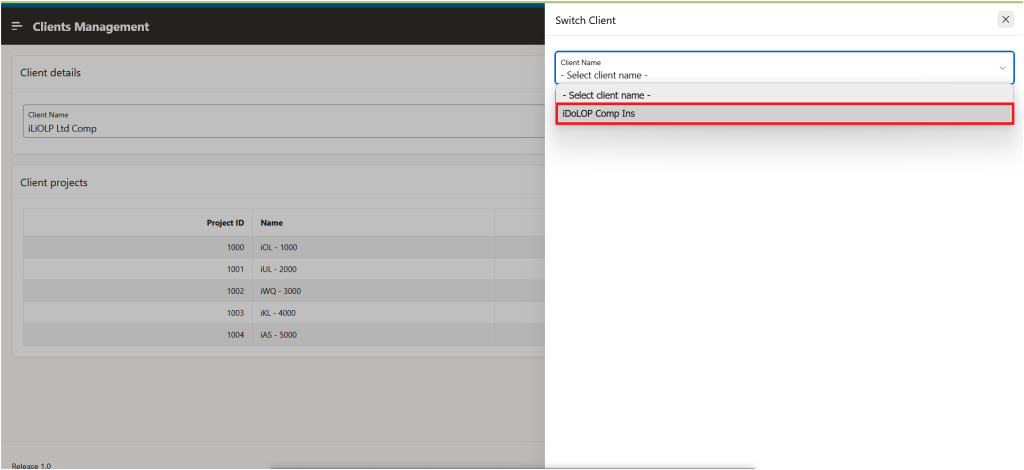
After selecting a different client, click the Apply Changes button. The application will redirect to the Home page and display the newly selected client name.
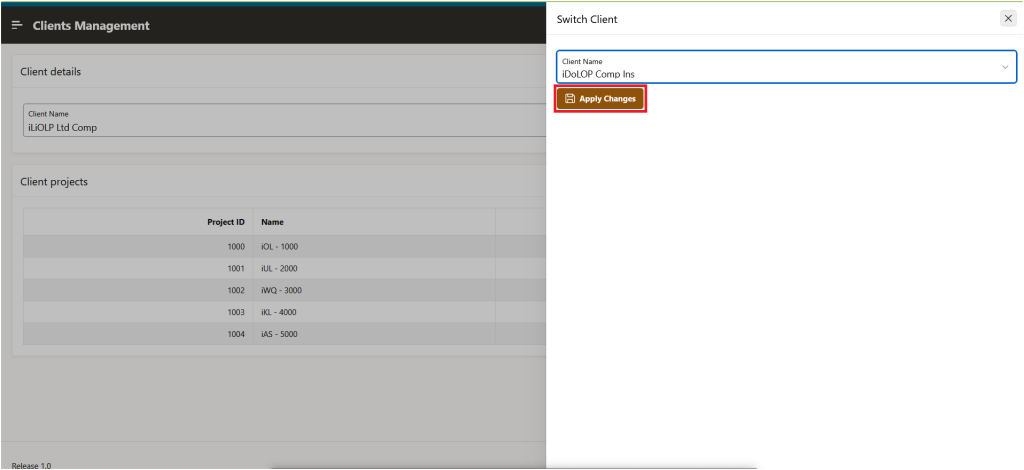
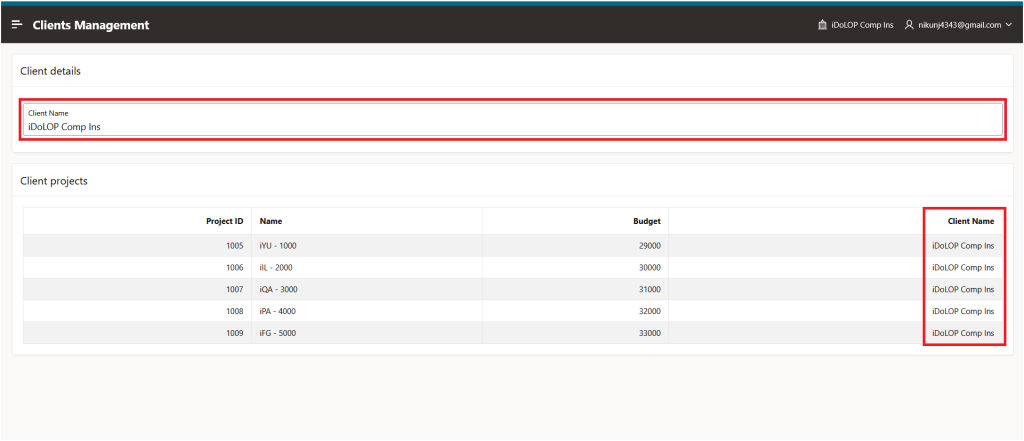
As shown below, we have successfully switched the client from iLiOLP Ltd Comp to iDoLOP Comp Ins.
All projects associated with the selected client are also displayed in the Client Projects region.