This blog is about how you can build cool nested interactive report in Oracle APEX. This is a custom solution and achieved using couple of dynamic action.
I have received lots of feedback on my previous blogs about nested classic report and enhanced nested reports to asking for Nested Interactive report.
Now, let’s see how we can achieve this.
Time needed: 30 minutes
- Create new page and let’s call it Page 6
Here, we will start with a new blank page
- Create DEPT region
Add new Interactive Report based on DEPT table.
- Create EMP region
Add new Interactive Report based on EMP table.
- Create Page Items
- Create Dynamic Actions
- Run and Test it
Page Level Setting
- Add following code in JavaScript section > Function and Global Variable Declaration
var gAction;
var gThis;
var gSpinner;
DEPT Region Settings
- Region source SQL query
select DEPTNO,
       DNAME,
       LOC
from DEPT- Region Static ID – dept
- DEPTNO Column Changes
- Type – Link
- Target
- Type – URL
- URL – javascript: apex.item(‘P6_DEPTNO’).setValue(#DEPTNO#);
- Link Text – <span class=”t-Icon fa fa-users”></span>
- Link Attributes – data-deptno=”#DEPTNO#”
EMP Region Settings
- Region source SQL Query
select EMPNO,
       ENAME,
       JOB,
       MGR,
       HIREDATE,
       SAL,
       COMM,
       DEPTNO
  from EMP
where deptno = :P6_DEPTNO- Page item to submit – P6_DEPTNO
- Static ID – emp
- Custom Attribute – style=”display:none”
Page Items
- P6_DEPTNO
- Type – Hidden
- Value Protected – Off
- Region – Department
Dynamic Actions
- Dynamic Action 1
- Name – On change – Refresh Employees
- Event – Change
- Selection Type – Item(s)
- Item(s) – P6_DEPTNO
- Client Side Condition
- Type – Item is not null
- Item – P6_DEPTNO
- Event Scope – Dynamic
- True Action 1
- Type – Execute JavaScript Code
- True Action 2
- Type – Refresh
- Selection Type – Region
- Region – Employee
gAction = 'VIEW_EMP';
gSpinner = apex.widget.waitPopup();
var vDeptNo = this.triggeringElement.value;
gThis = $('#dept a[data-deptno="'+vDeptNo+'"]');
$('.level1_row').hide();
$('#emp').hide();- Dynamic Action 2
- Name – After refresh – reset
- Event – After Refresh
- Selection Type – Region
- Region – Employee
- Client Side Condition
- Type – JavaScript Expression
- JavaScript Expression – gAction == ‘VIEW_EMP’
- True Action
- Action – Execute JavaScript code
- Code
gAction = '';
let vThis = gThis;

if($('#dept .level1_row').length == 0){
  let vColSpan = $(vThis).closest("tr").find("td").length;
  let vClass = $(vThis).closest("td").attr("class");
  let vTR = $(vThis).closest("tr");
  let vHTML = $('<tr class="level1_row" style="display: none;"><td class="'+vClass+'" colspan="'+vColSpan+'" style="padding: 15px;"></td></tr>');

  $(vHTML).insertAfter($(vTR));
  $('#emp').appendTo($('tr.level1_row>td'));
}
else{
  var vHTML = $('tr.level1_row');
  var vTR = $(vThis).closest("tr");

  $(vHTML).insertAfter($(vTR));
}

$('.level1_row').show();
$('#emp').show();

gSpinner.remove();
Run and Test
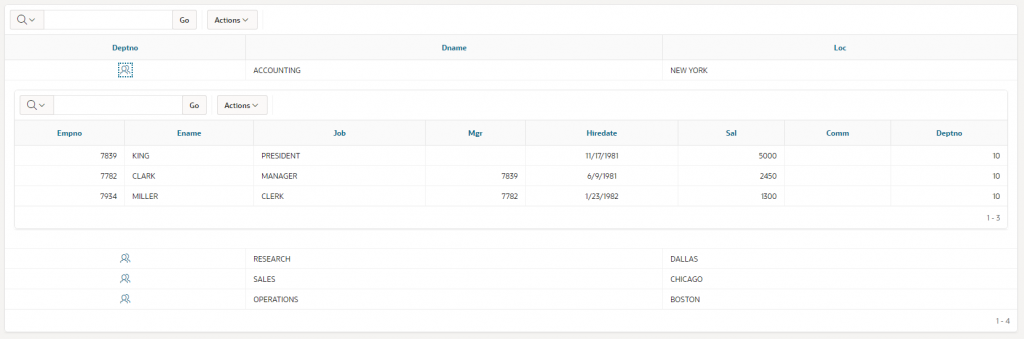
You can test it now. Once you click on DEPTNO icon, it should add a row underneath with the report of EMP of that DEPT.
Known Issue
When your EMP region has more data to display and when it shows pagination, it will break once you change pagination. In such case, put your EMP region number of rows to “Show All”. If you have large data, you can add height and width of “EMP” region. This will add inline scrollbar to avoid large scrolling.
Click here to see working demo.
Hope that helps!
Regards,
Jaydip Bosamiya
jbosamiya@gmail.com
Pingback: Launching apexpert.in - Integrated solutions using Oracle APEX and Native Mobile App - APEXPERT - Oracle APEX and Mobile App Consultants
Excellent can you share this application code?
Really nice blog…Excellent..!
This is really nice post. Thank you so much.
One question, how to collapse / hide child report once user clicks again the same row icon of the parent report ?
Awesome , Excellent work appreciated
Hi Jaydip,
Thank you so much for this guide. Question – how would we get a 3 level nested IR going? We have tried it but when we try to go back to the first level, the page hangs.
And by any chance did you get around the pagination error?
Thanks
Kevin
This is really nice post. Thank you so much.
One question, how to collapse / hide child report once user clicks again the same row icon of the parent report ?
How to Download the Nested report with the child data too.?
Thank you so much for the informative post. It really helped and amazing.
I have the same question, how to collapse / hide child report once user clicks again the same row icon of the parent report ?
I have implemented the above code and it works like a charm. Thank you for the nice piece of work.
I have make a little simple tweak to the solution in order to collapse / hide child report once user clicks again the same row icon of the parent report. Tested it on level one report, add one page item i.e.
* Page Items
P6_ISVISIBLE
Type – Hidden
Value Protected – Off
Region – Department
*on Dynamic Action 1
Name – On change – Refresh Employees
replace the code with the following
gAction = ‘VIEW_EMP’;
gSpinner = apex.widget.waitPopup();
var vDeptNo = this.triggeringElement.value;
var vIsVisible = apex.item(“P6_ISVISIBLE”).getValue();
if (vIsVisible == vDeptNo)
{
$(“#tracking”).hide();
apex.item(“P6_ISVISIBLE”).setValue(0);
}
else{
gThis = $(‘#dept a[data-deptno=”‘+vDeptNo+'”]’);
$(‘.level1_row’).hide();
$(‘#tracking’).show();
apex.item(“P6_ISVISIBLE”).setValue(vDeptNo);
}
Thanks for the updates.
I have tried the hide option, but its not working.
The above code is not working for minimize option, can you please share the detail step.